


A Comprehensive Guide to Next.js: A Modern Framework for Building High-Performance React Applications

Next.js, released in 2016 by Vercel, emerged in response to the growing demand for faster, more optimized web applications, particularly in server-side rendering (SSR) and search engine optimization (SEO). Traditional single-page applications (SPAs) built with React faced challenges, such as slow initial loading times and SEO limitations. Next.js addresses these issues by providing a robust framework for React-based applications, enabling SSR, static site generation, and other performance-enhancing features. In this article, we will explore the core features and benefits of using Next.js to build modern, scalable, and performant web applications.
What is Next.js?
Next.js is an open-source JavaScript framework that enables developing single-page applications (SPAs) using React. It simplifies and streamlines the process of building efficient React applications with server-side rendering (SSR) and static site generation (SSG). Developed by Vercel (formerly Zeit), Next.js has gained significant attention and widespread adoption.
Key features and advantages of Next.js include:
- Server-side rendering (SSR): Real-time rendering of pages on the server enhances initial loading speed and improves search engine optimization (SEO).
- Static site generation (SSG): Generating static HTML pages during the build process allows for deployment on any static site hosting service, improving performance and scalability.
- File system routing: Next.js automatically creates routes based on the file structure in the /pages directory, simplifying the routing process.
- Automatic code splitting: Next.js automatically splits code for each page, loading only the necessary code, which reduces page load time.
- API routes: Next.js allows developers to build both frontend pages and API interfaces within the same project, simplifying the development process for full-stack applications.
- Built-in CSS and Sass support: Next.js supports CSS Modules and provides built-in support for CSS-in-JS libraries and preprocessors like Sass.
- Out-of-the-box TypeScript support: Next.js offers seamless integration with TypeScript, eliminating the need for additional configuration.
- Plugin ecosystem: The Next.js community offers a wide range of plugins that extend the functionality of the framework.
Next.js provides a developer-friendly experience by abstracting away complex configuration tasks such as routing and code splitting. This allows developers to focus on writing application logic, resulting in increased productivity. Due to its flexibility and performance, Next.js has become a popular choice for building production-ready websites and applications.
Is Next.js Better than React?
Next.js emerged from the demand of developers and enterprises for building faster, more optimized web applications, particularly focusing on server-side rendering (SSR) and search engine optimization (SEO). React is a client-side rendering library that relies on JavaScript to run in the user's browser to generate HTML content. This pattern creates challenges in user experience and performance, especially regarding initial loading time and SEO unfriendliness.
Next.js primarily tackles the following issues:
- SEO and initial loading performance: Traditional client-side rendered React applications may not be favorable for search engine crawlers and often have longer initial loading times. Next.js provides server-side rendering as the default behavior, meaning that pages are rendered as HTML on the server and then sent to the client. This approach significantly improves initial loading speed and is SEO-friendly.
- Development efficiency: When developing large-scale applications with React, developers often need to configure routing, code splitting, and build optimization. Next.js reduces the manual setup of these tasks by adopting a convention-over-configuration approach, offering easy file-system-based routing, automatic code splitting, and hot reloading, which improves development efficiency.
- Build and deployment: Next.js comes with a built-in build system and optimizations for continuous integration, making the transition from development to production simple. Moreover, seamless integration with the Vercel platform makes deployment incredibly easy.
- Flexible data fetching strategies: Next.js offers flexible data fetching methods, such as getStaticProps and getServerSideProps, allowing developers to choose different data pre-rendering strategies based on page requirements, such as static generation or server-side rendering.
- TypeScript support without additional setup: Next.js was designed with TypeScript support in mind from the start, allowing developers to enjoy the benefits of a strongly typed language without complex configuration.
- API routing: Next.js allows developers to build both frontend pages and API interfaces within the same project, simplifying the development process for full-stack applications.
- Ecosystem and community support: Over time, Next.js has established a healthy ecosystem of plugins and strong community support, providing developers with various resources and integration of third-party libraries.
In summary, Next.js aims to simplify and optimize the development process of React-based applications while offering high-performance and SEO-friendly solutions. It represents an essential trend in modern web application development.
Server-side Rendering and Static Site Generation
Server-side Rendering (SSR) and Static Site Generation (SSG) are two popular techniques used in web development for optimizing performance, improving user experience, and enhancing search engine optimization (SEO).
Server-side Rendering (SSR) in Next.js
In SSR, the HTML content of a web page is generated on the server for each request, and the resulting HTML is sent to the client's browser. This process ensures that the browser receives a fully-rendered page, making it faster to display the content and improving SEO since search engine crawlers can easily index the content. SSR is particularly useful for dynamic websites where content changes frequently and must be fetched from a database or an API.
Next.js uses SSR by default, allowing developers to build high-performance, SEO-friendly web applications. To fetch data for SSR in Next.js, developers can use the getServerSideProps function, which fetches data on each request and passes it as props to the page component.
Static Site Generation (SSG) in Next.js
In SSG, the HTML content of a web page is generated at build time, creating static HTML files that are served to the client without any additional server-side rendering. Since the files are pre-rendered, the content loads faster, providing a better user experience. SSG is ideal for content-heavy websites with infrequent updates, as it reduces server load and ensures consistent performance.
Next.js supports SSG using the getStaticProps function, which fetches data at build time and generates the static HTML files. When using SSG, you can also define dynamic routes with the getStaticPaths function, allowing you to pre-render a set of pages with dynamic data.
Both SSR and SSG have their advantages and use cases. Next.js offers the flexibility to choose the best approach for each page or even use a hybrid approach, combining the benefits of both techniques to build performant, scalable, and SEO-friendly web applications.
Getting Started with Next.js
1. Create a Next.js Project using create-next-app
- To create a new Next.js application, use npx (npm's package runner) by executing the following command. This will automatically download create-next-app and set up a new project for you:
npx create-next-app my-next-app- Afterward, navigate to the project directory:
cd my-next-app- Start the development server with the following command:
npm run dev- Alternatively, if you're using yarn, run:
yarn devYour Next.js application will now be running on localhost:3000, and you can access it in your browser.
2. The Basic Directory Structure of Next.js
Next.js operates on the principle of convention over configuration, meaning the basic directory structure and workflow of a project are predetermined. Below is a common directory structure in a Next.js application:
my-next-app/
|-- pages/
|   |-- index.js        # Home page
|   |-- _app.js         # Optional App component, used to initialize pages
|   `-- [Other pages].js
|-- public/             # Directory for static files, such as images, favicon, etc.
|-- styles/             # Directory for style files
|-- node_modules/       # Directory for project dependencies
|-- package.json        # File for project dependencies and script configurations
|-- next.config.js      # Optional Next.js configuration file
`-- [Other configuration files]- pages/: This is the directory where page components are stored, each file automatically corresponds to a route. For example, pages/about.js corresponds to the /about route.
- public/: Used to store static resources, such as images, fonts, etc. These files can be directly accessed in the browser via the / path.
- styles/: This is where CSS files are saved, you can organize your style files as needed.
- node_modules/: This directory stores all installed dependency packages.
- package.json: Defines the project's dependencies and runnable scripts.
- next.config.js: An optional configuration file used to customize advanced Next.js configurations, such as adding environment variables, modifying the Webpack configuration for builds, etc.
Through this directory structure, Next.js provides a powerful and flexible framework, allowing developers to quickly start projects and expand as needed.
3. Deployment
If you already have a server set up with a Node.js environment, here's how you can deploy a Next.js application on your server:
Step 1: Build the Application Firstly, you need to build the Next.js application within your local development environment. Doing so will generate a .next directory containing an optimized version of the application designed for production. Run the following command:
next buildStep 2: Install Dependencies On your server, navigate to your application's directory and install the necessary dependencies using npm install or yarn, assuming you haven't already uploaded the node_modules directory. Use the following commands:
cd /path/to/your/app npm installStep 3: Launch the Application Use the next start command to launch your application. This will start a Node.js server, providing HTTP services in a production environment. Use the following command:
next start -p YOUR_PORTReplace YOUR_PORT with the desired port number for your application to run on (such as 80, 443, or 3000). If you don't specify a port, Next.js will default to port 3000.
Simply deploying your project code to your server may not guarantee continuous and stable operation. There are additional tasks to ensure reliability and efficiency. In a production environment, you might want the application to run in the background and automatically restart upon crashing, which can be achieved using a process manager like pm2. If you're running Nginx or Apache on your server, you may want to set up a reverse proxy to forward external requests to your Next.js application's port, enabling SSL, custom domains, and other advanced features. These tasks can be time-consuming and come with high maintenance costs.
An alternative is to use services like EdgeOne Pages for quick and easy website building and hosting. EdgeOne's acceleration and security features significantly improve your website's performance and stability.
Hosting Next.js Projects with EdgeOne Pages
What is EdgeOne Pages?
EdgeOne Pages is a high-performance web application deployment platform utilizing Tencent EdgeOne's global infrastructure. It offers full-stack edge capabilities, including serverless code execution, for efficient and dynamic web development. The platform continuously evolves to stay at the forefront of deployment technology.
EdgeOne Pages is a leading web application deployment platform with key advantages:
- Rapid Go-Live Process: Efficient deployment pipeline for quick iterations and faster time-to-market, enabling swift response to market demands.
- Full-Stack Edge Capabilities: Edge computing technology for improved performance and reduced latency in complex web applications.
- Fast Access from Anywhere: Tencent's global infrastructure ensures fast content delivery and optimal user experiences worldwide.
- Comprehensive Feature Access: A free, stable, and reliable service that continuously evolves with premium features and value-added services to support your growing needs.
Getting Started with EdgeOne Pages
Step 1: Connect Git Repo
The first step in deploying your web application is to connect your Git repository. EdgeOne Pages seamlessly integrates with version control platforms, enabling smooth synchronization between your development workflow and the deployment process.
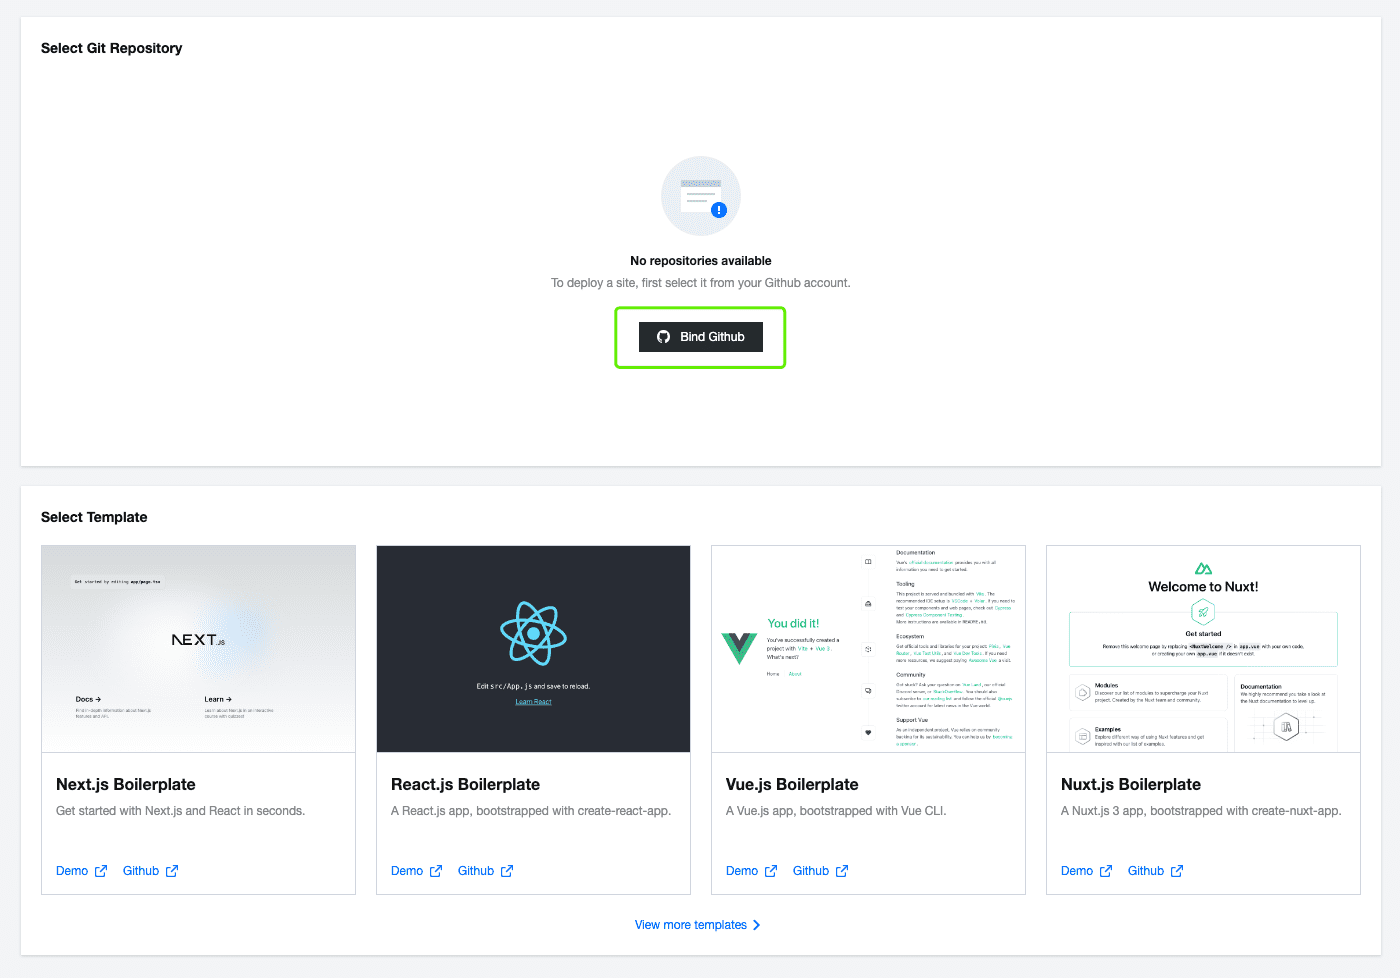
Step 2: Create Next.js Project with Template
We provide templates for most mainstream front-end frameworks such as Next.js, React, Vue, and so on. Click Here to explore more EdgeOne Pages Templates. You can develop using our templates and then deploy. After authorizing Github, select the Next.js template. Set the type for the new template repository, then click Create to create it on GitHub.
After you select a template, we will create a repository on your GitHub account based on that template. The deployment process will start automatically. You can then clone this repository to your local machine for further development and push changes as needed.
If your project code is already in a GitHub repository, you can simply select the desired project on the Pages operation page and effortlessly deploy it to the online environment.
Step 3: Deploy Globally
With your repository connected and build settings configured, you're ready to deploy your application globally. Review your settings to ensure everything is correct. Click Start Deployment, EdgeOne Pages will automatically build your project and deploy it to its global edge network.
By following these steps, you can quickly and easily deploy your web application using EdgeOne Pages, taking advantage of its powerful edge network and streamlined workflow.
In This Article, we provide an in-depth exploration of the features and operational guide of EdgeOne Pages. Continue reading to uncover more insightful details.
Conclusion
In conclusion, Next.js is a powerful tool for creating high-performance React applications, offering benefits such as server-side rendering and static site generation. This article has provided a guide on getting started with Next.js and deploying projects using EdgeOne Pages. Ready to Start Your Next.js Project? Welcome to Sign Up and Contact Us for more information.


