Stripe Integration
Stripe is an API that supports online payment processing and business solutions, suitable for internet merchants of all scales. Accept payments through AI and scale faster.
Overview
This guide details the complete steps to integrate the Stripe payment system on the EdgeOne Pages platform, helping you quickly implement secure online transaction features. Meanwhile, the guide covers the access process for the Supabase database, providing efficient solutions for product information management and user data storage.
Getting Started
Select the Stripe online payment integration template provided by the Pages platform to quickly start the development process. Simply click the Stripe Subscription Starter template to obtain a complete project framework.
This tutorial is divided into three core steps:
1. Service activation and configuration initialization for Stripe
2. Enable the Supabase platform and initialize data
3. Deploy and launch the EdgeOne Pages project
The following sections will provide detailed descriptions of the specific operation process for each step to help you achieve smooth integration.
Register Stripe and Enable Service
1. Register Stripe
Visit the Stripe official website (Stripe.com), fill in and submit the registration form to complete account creation. After successful registration, the system will guide you to enter the
Dashboard management interface to start configuring the payment service.
2. Create a Webhook
In the
Dashboard interface, navigate to the Developers option at the bottom of the left menu. Click to enter, then select the API Keys tab, and you will see the API key information of your account.Properly copy and securely store the displayed
Secret key. This credential will be used in subsequent configuration processes to establish a connection between EdgeOne Pages and the Stripe service.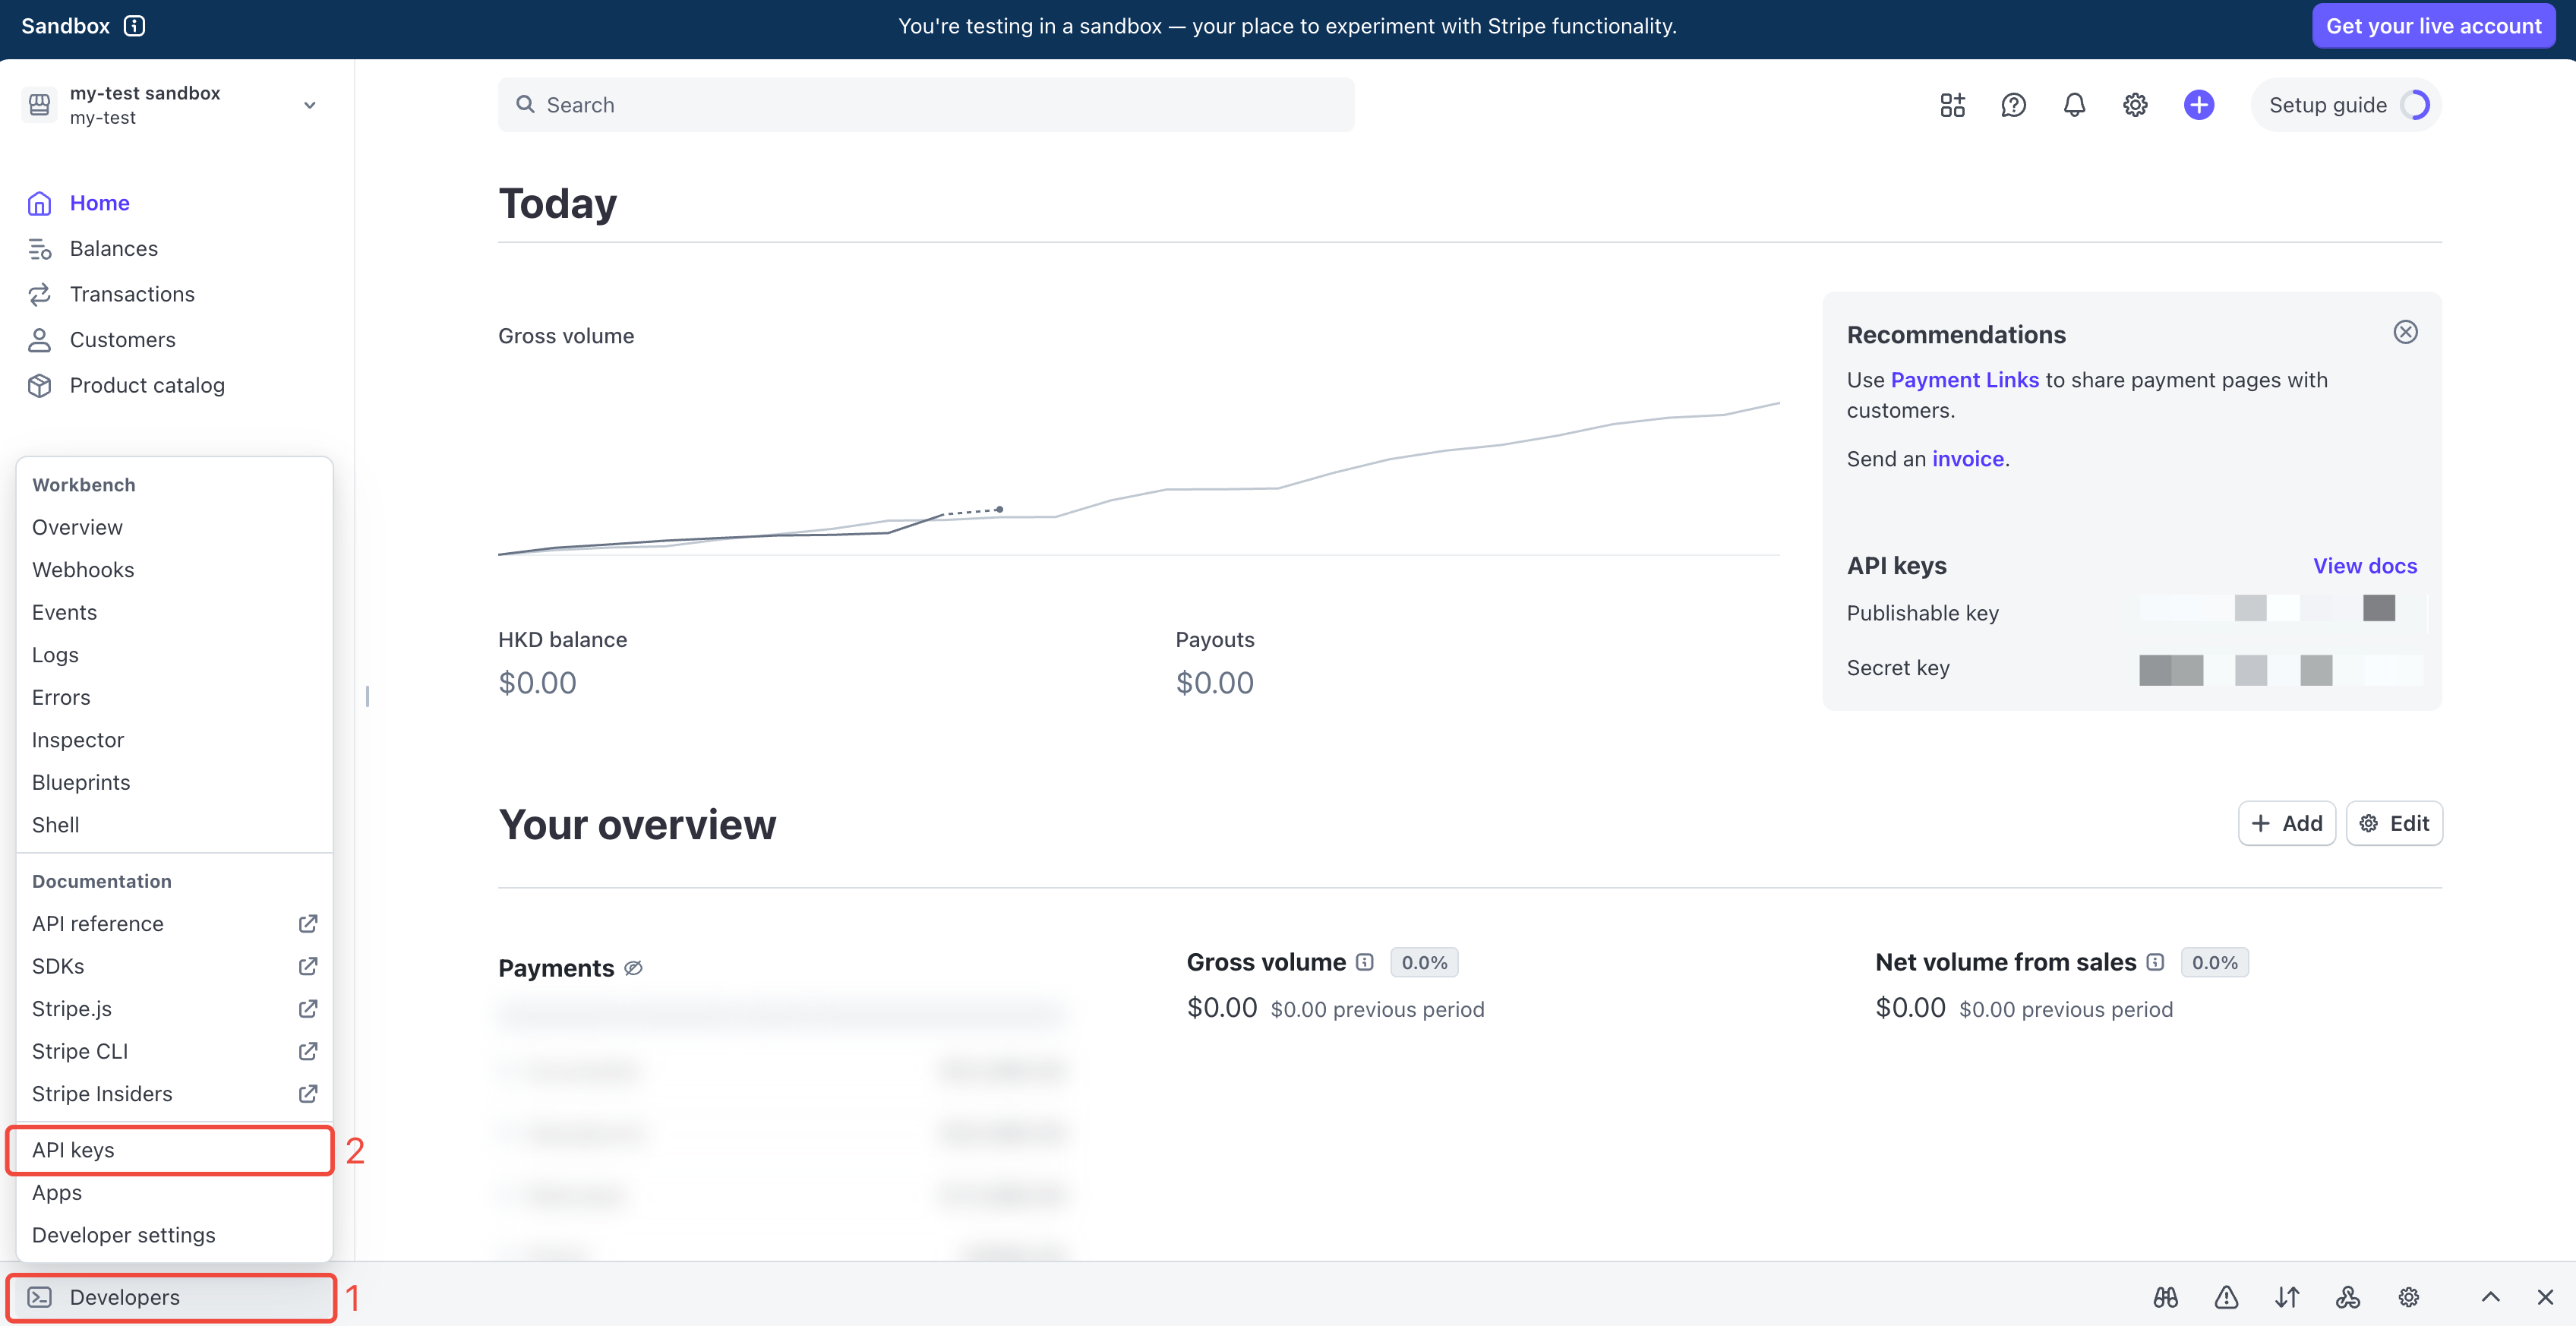
Click Developer in the bottom-left corner, then enter Webhooks. Here you need to configure a trigger to synchronize Supabase data updates when there are changes in products or pricing, keeping your application data always synchronized.
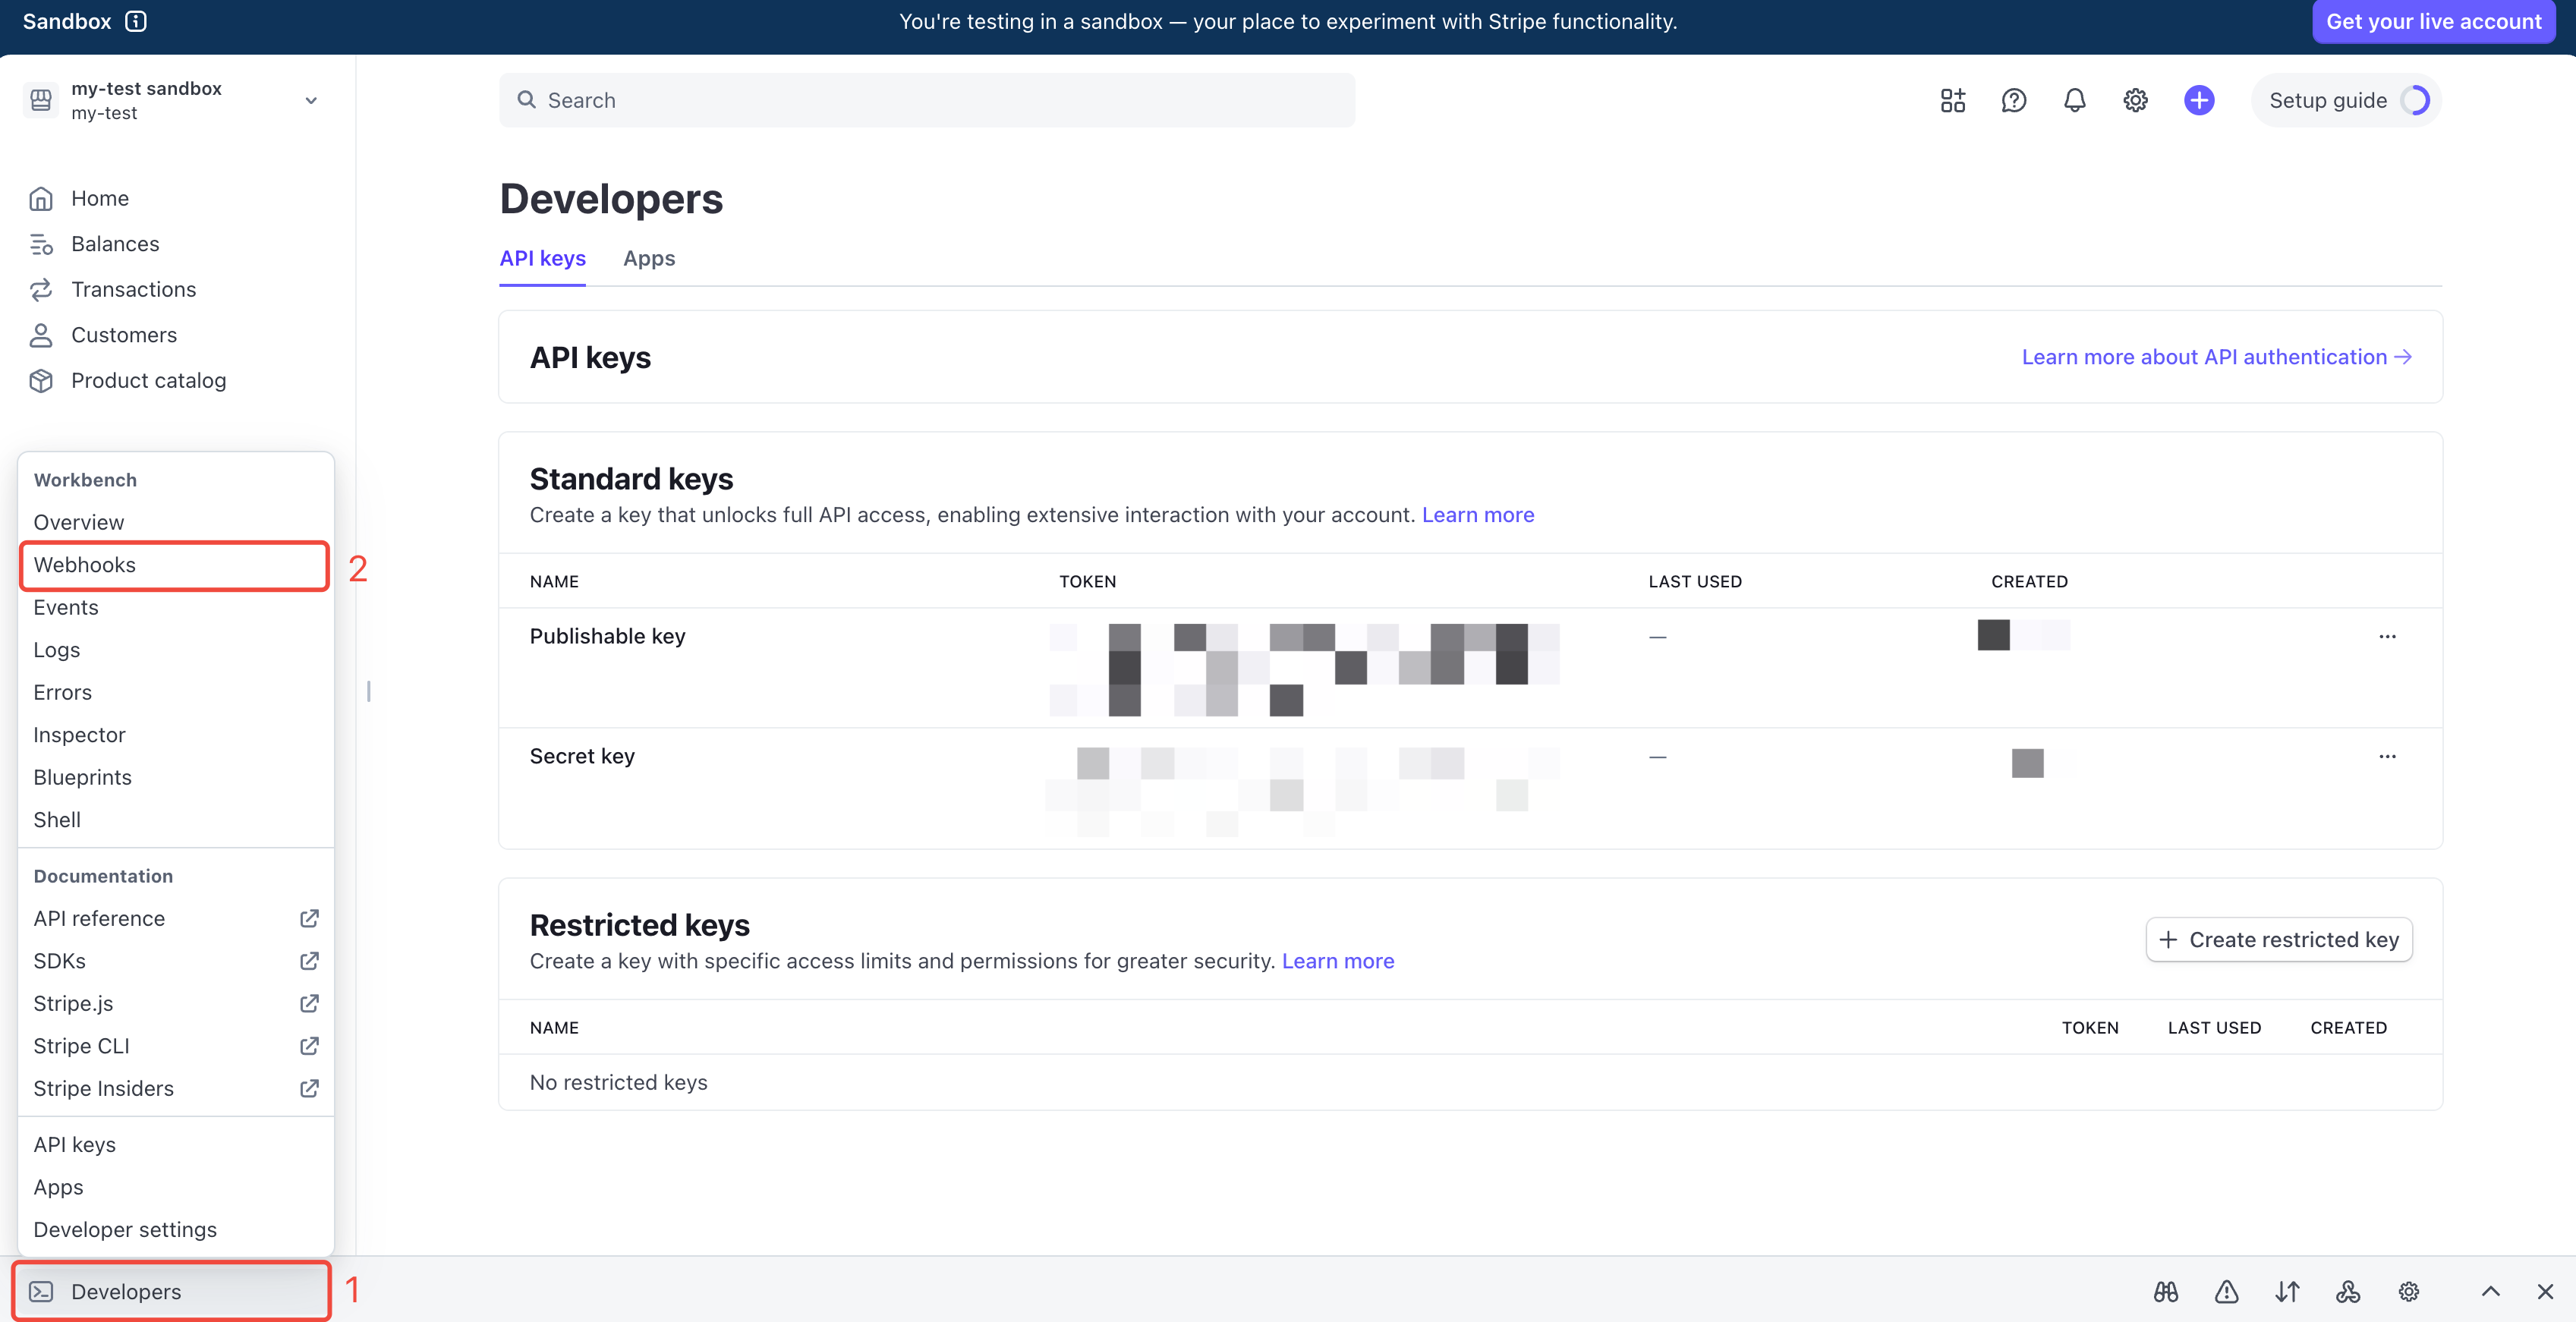
On the Webhooks page, click
Add destination to add a new trigger.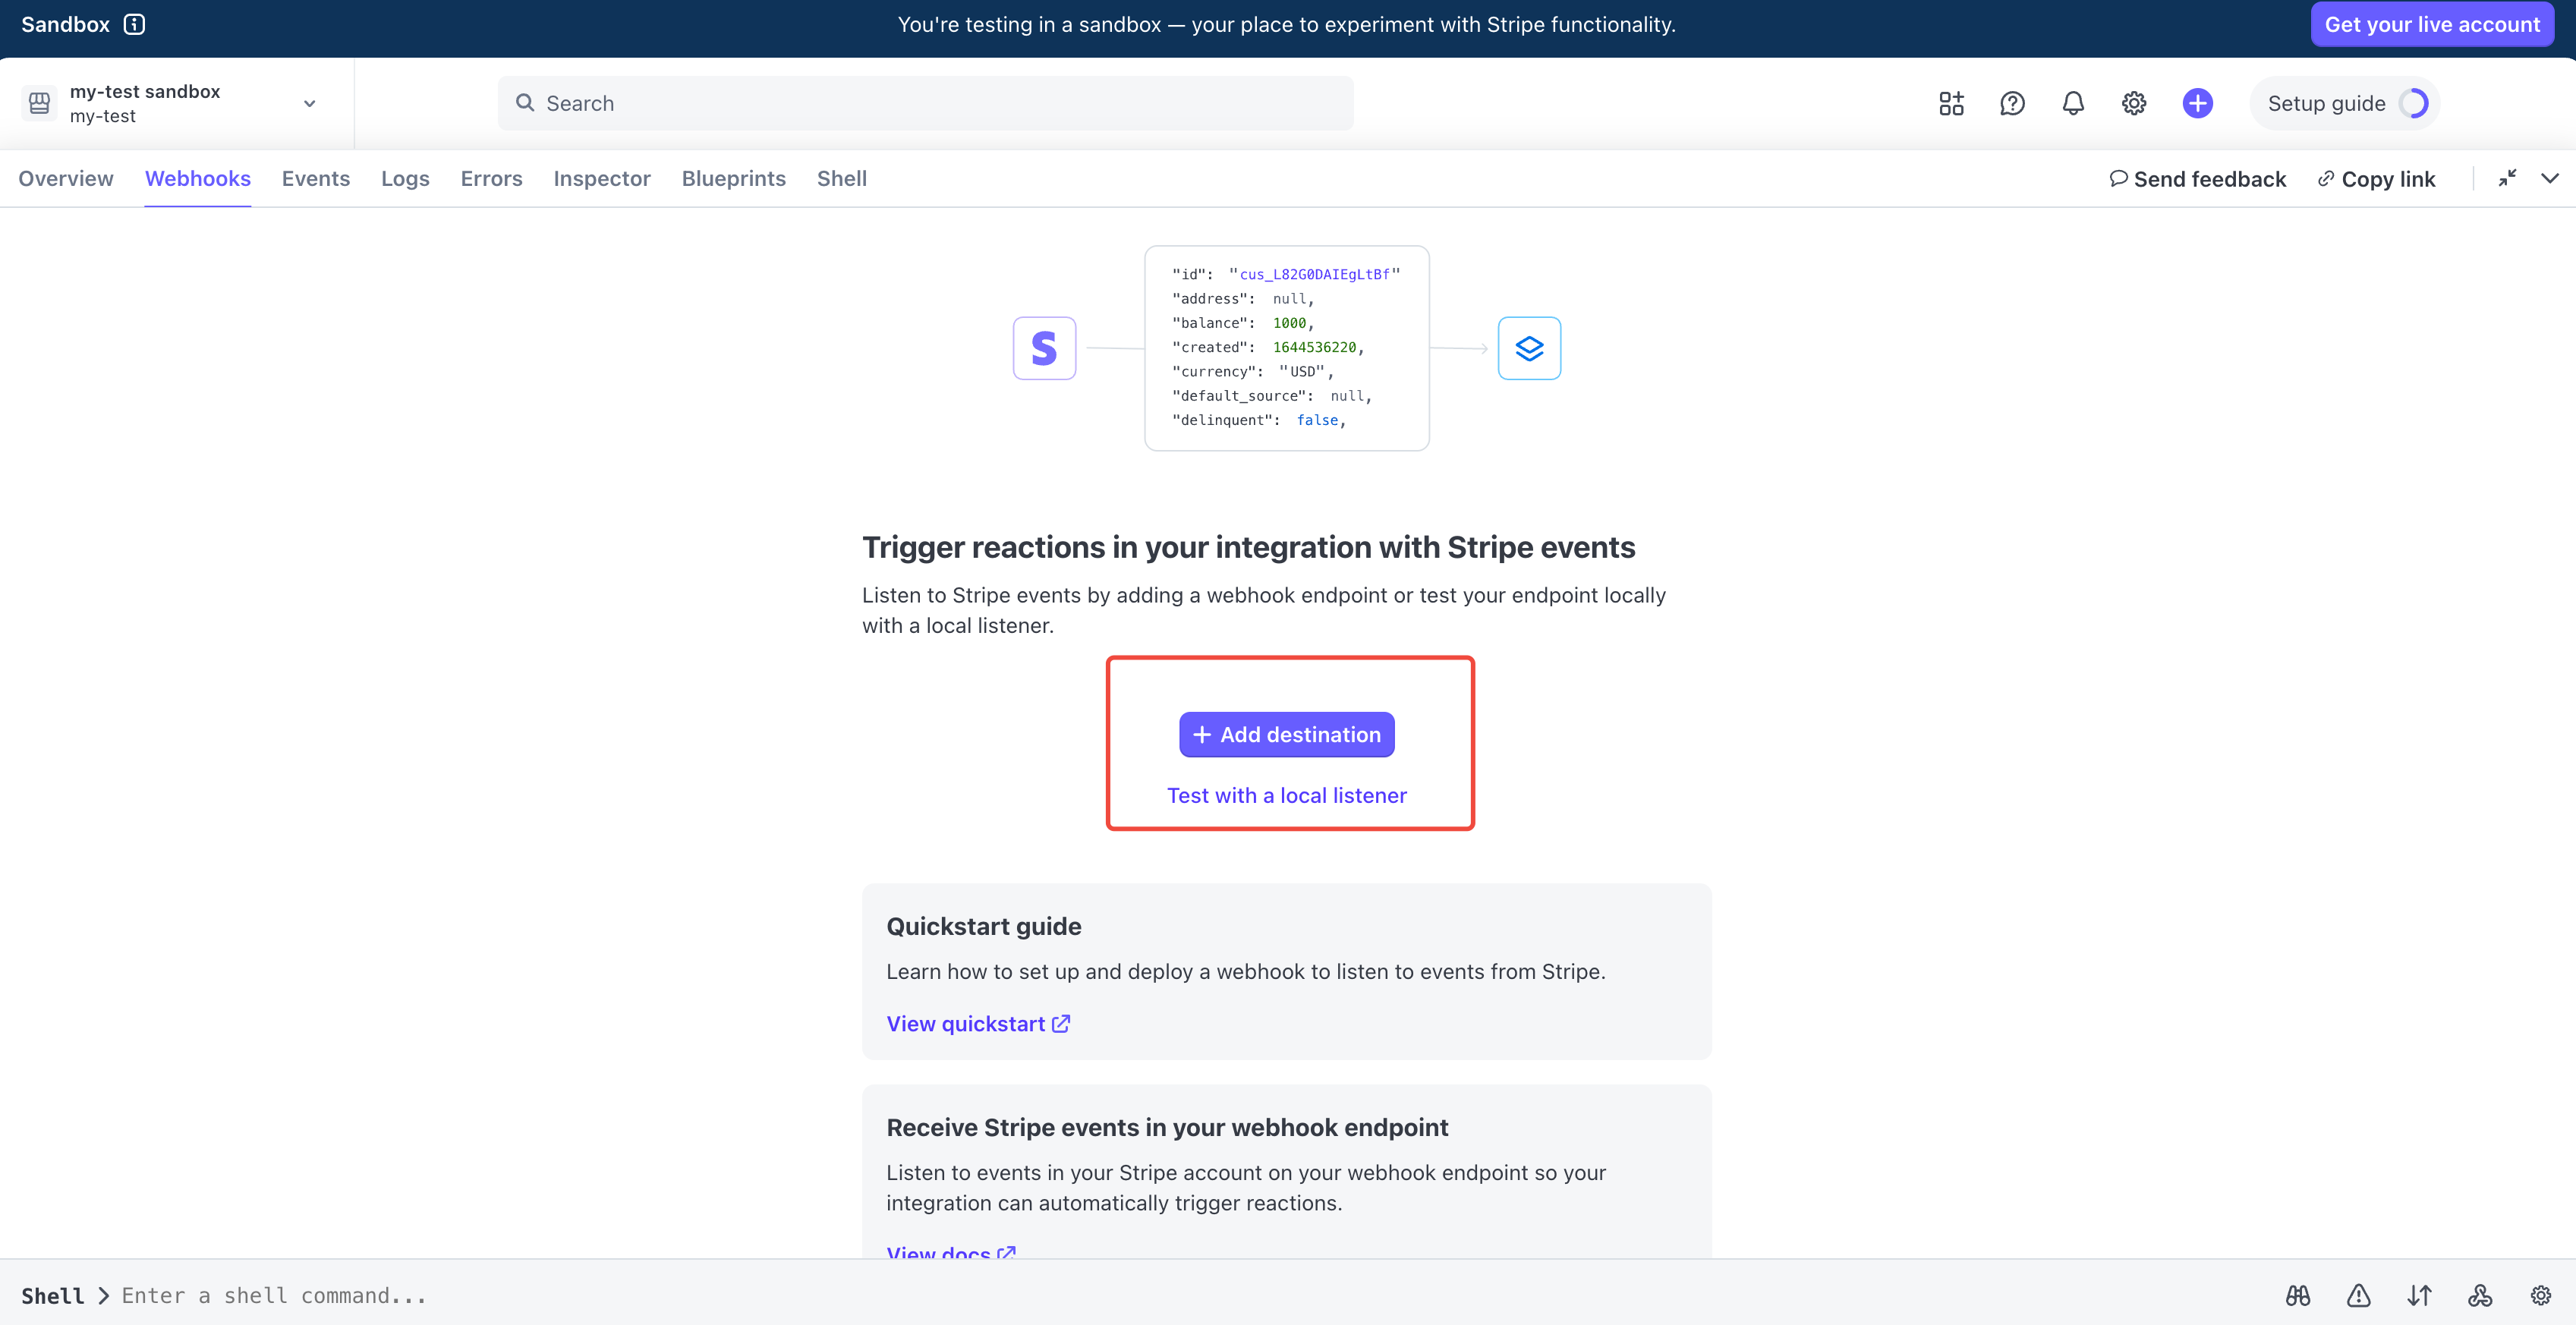
In the new trigger configuration, select these events:
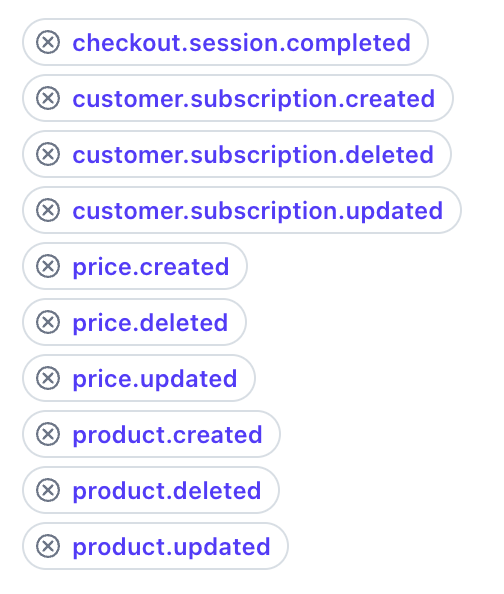
On the Webhooks configuration page, you need to add an endpoint URL in the following format:
https://${your-app-name}.edgeone.app/stripe/webhook
Note: Replace
${your-app-name} with the actual project name you obtained after deploying on EdgeOne Pages. You can leave this URL blank for now and return to complete the configuration after your EdgeOne Pages project is deployed.
Once configured, Stripe will send notifications of product and price changes to Supabase via this webhook, thereby triggering the auto-update of the database to ensure your application data remains up-to-date.

After creating a webhook, copy the
Signing secret and record it for subsequent filling.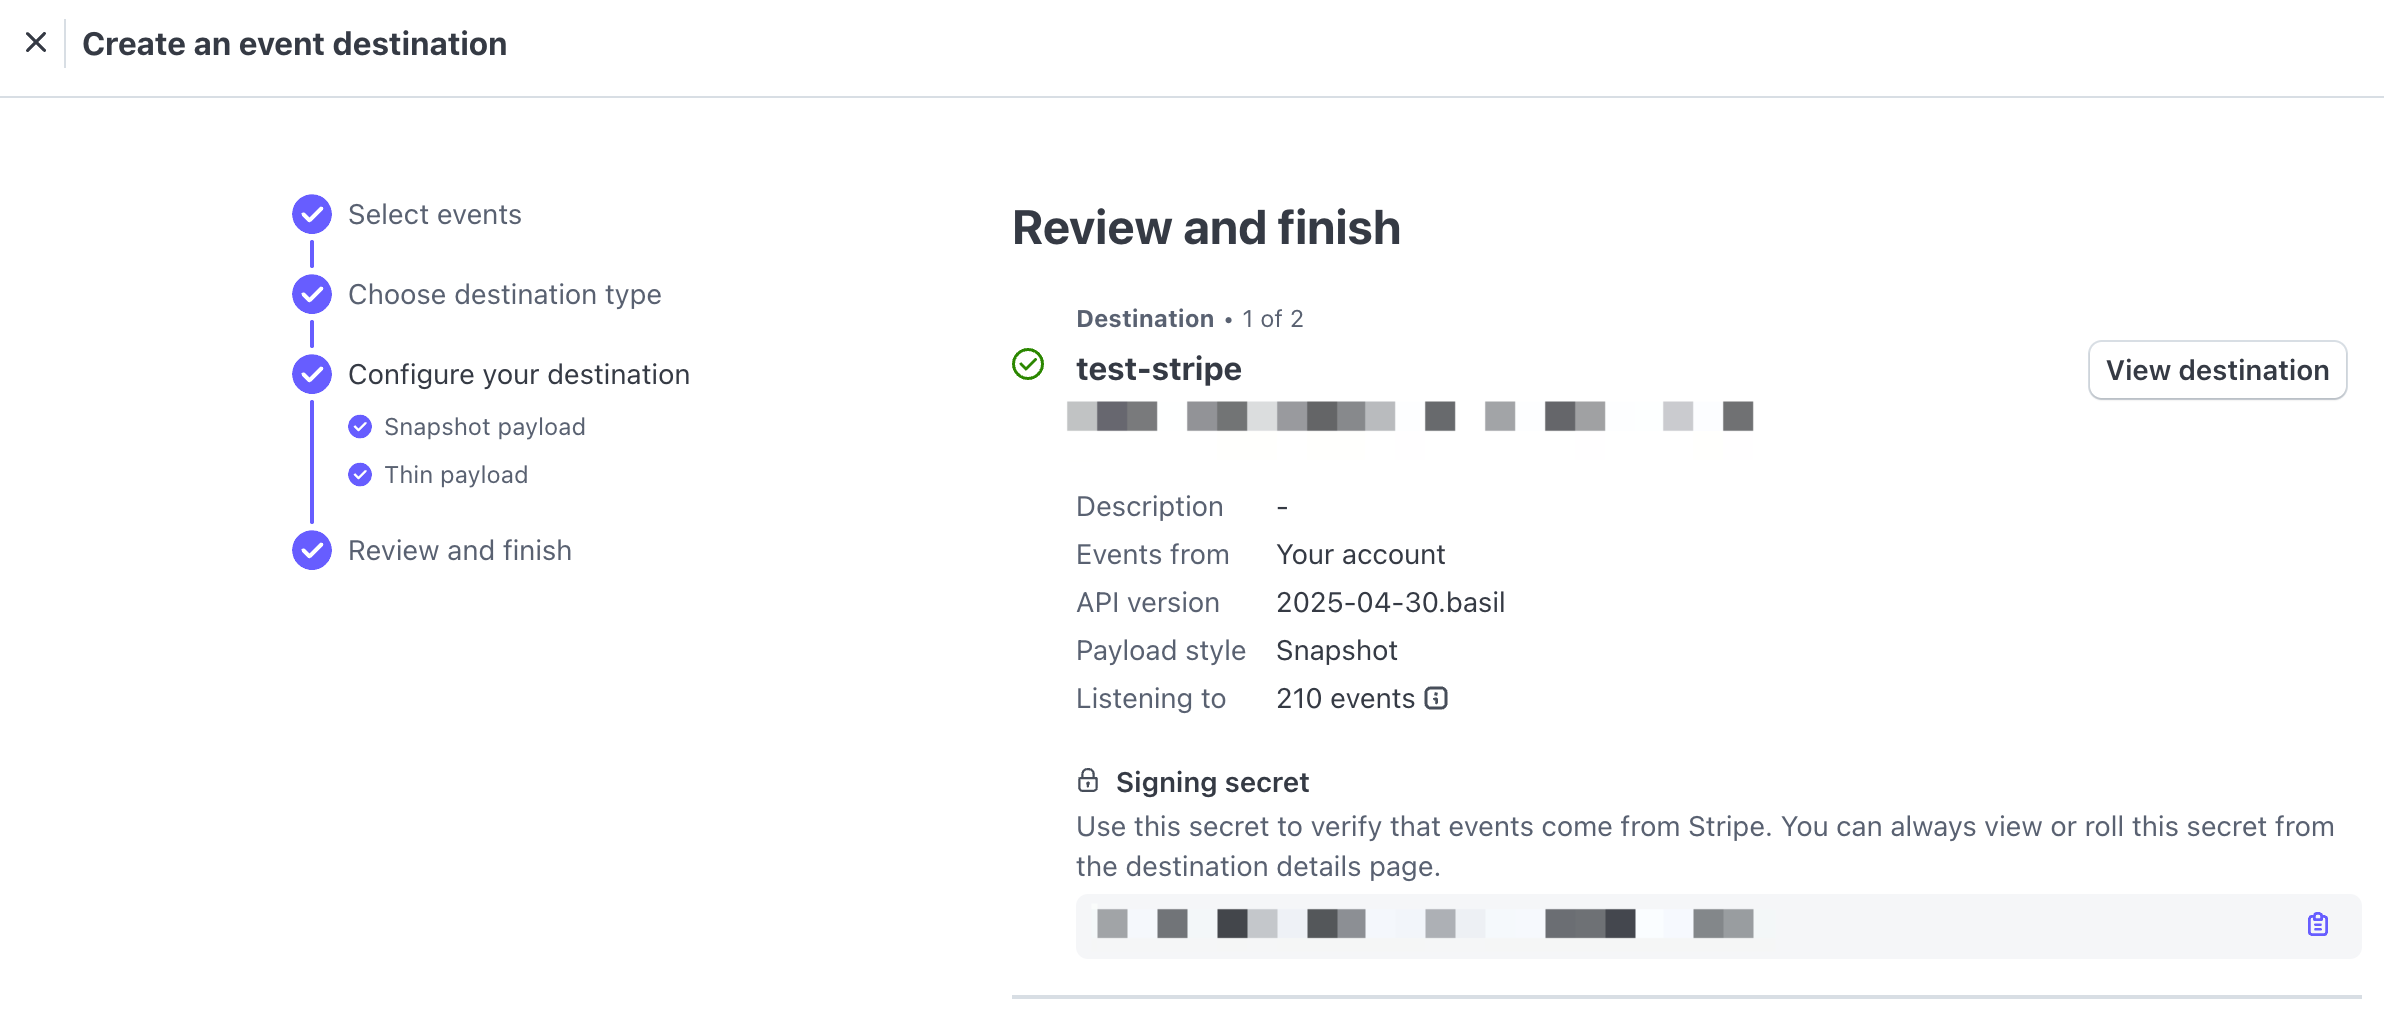
Preparing Supabase
The Supabase database will be used to store your application's core data, including user information, product information, price information, and other key data.
1. Registering and Integrating
First, complete the registration and access process for Supabase. For detailed guidance, refer to the Supabase Integration Tutorial.
2. Initialize a Database Table
After completing Supabase account settings, you need to initialize the necessary database table structure:
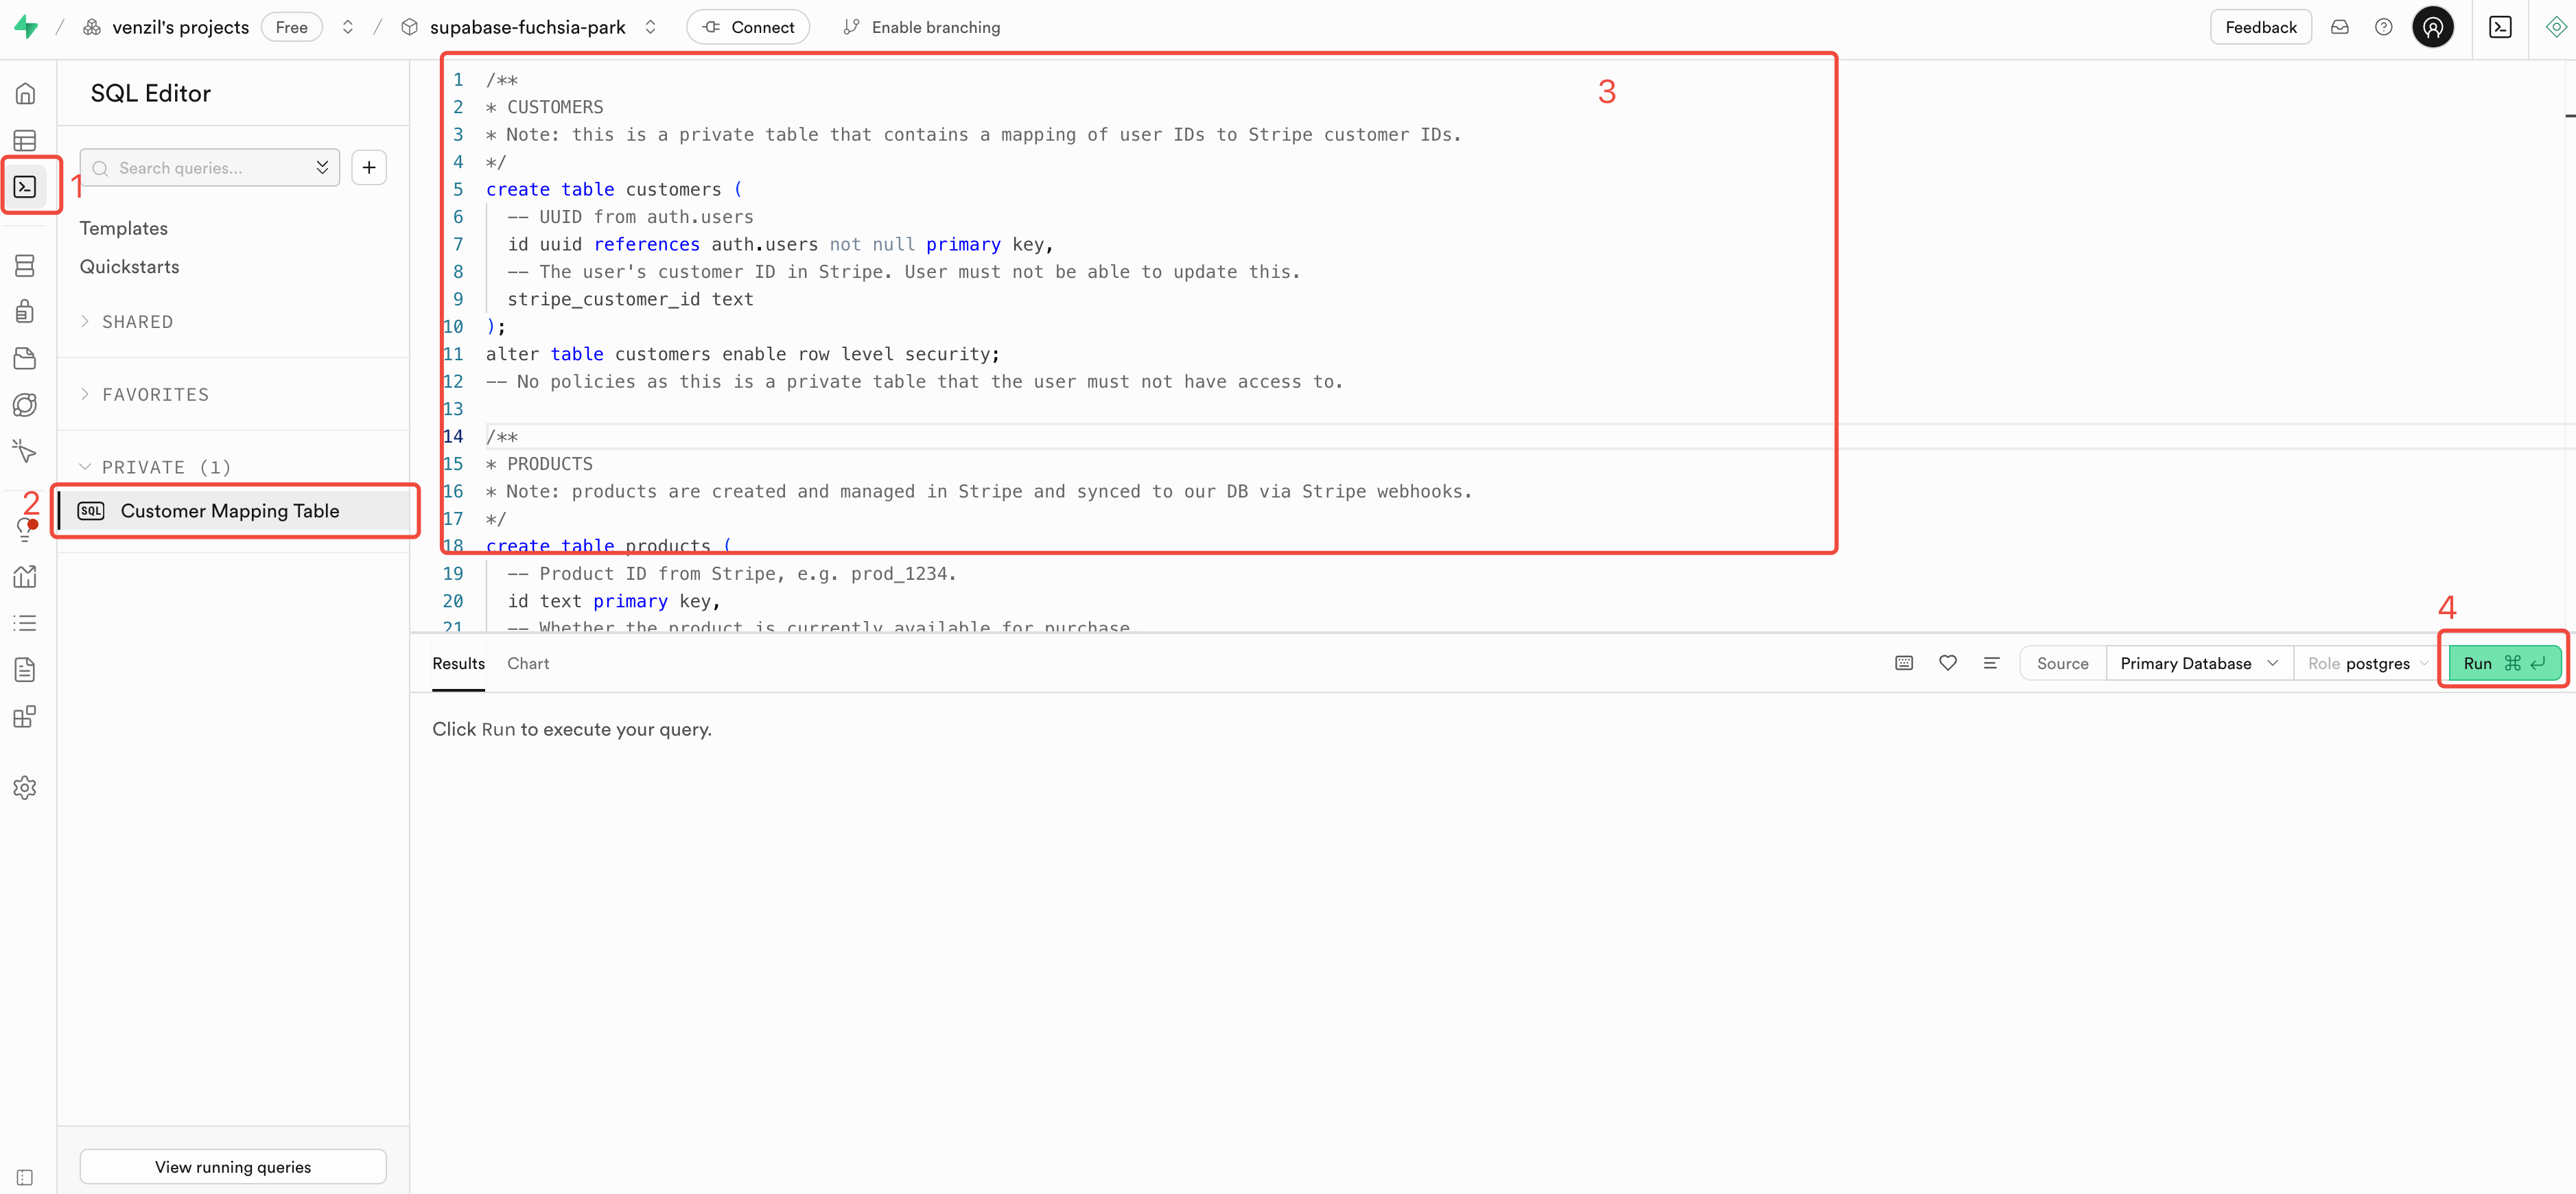
1. Download the provided initialization SQL file.
2. In the Supabase management interface, navigate to the SQL editor.
3. Copy the SQL code from the downloaded initialization file completely into the editor.
4. Click the
Run button to execute the SQL command.
After successful execution, the system will create all necessary data tables and relationships, providing a complete data storage foundation for your application.
Deploying in EdgeOne Pages
After completing the configuration of Stripe and Supabase, you need to set up the necessary development environment variables so that your application can properly connect to these services. You can enter the response parameters into the local
.env file for local development. If deployment to EdgeOne Pages is required, additional environment variables need to be filled in.
1. Create an Application Template
Find Stripe Subscription Starter on the EdgeOne Pages template page, click
Deploy to enter the deployment page.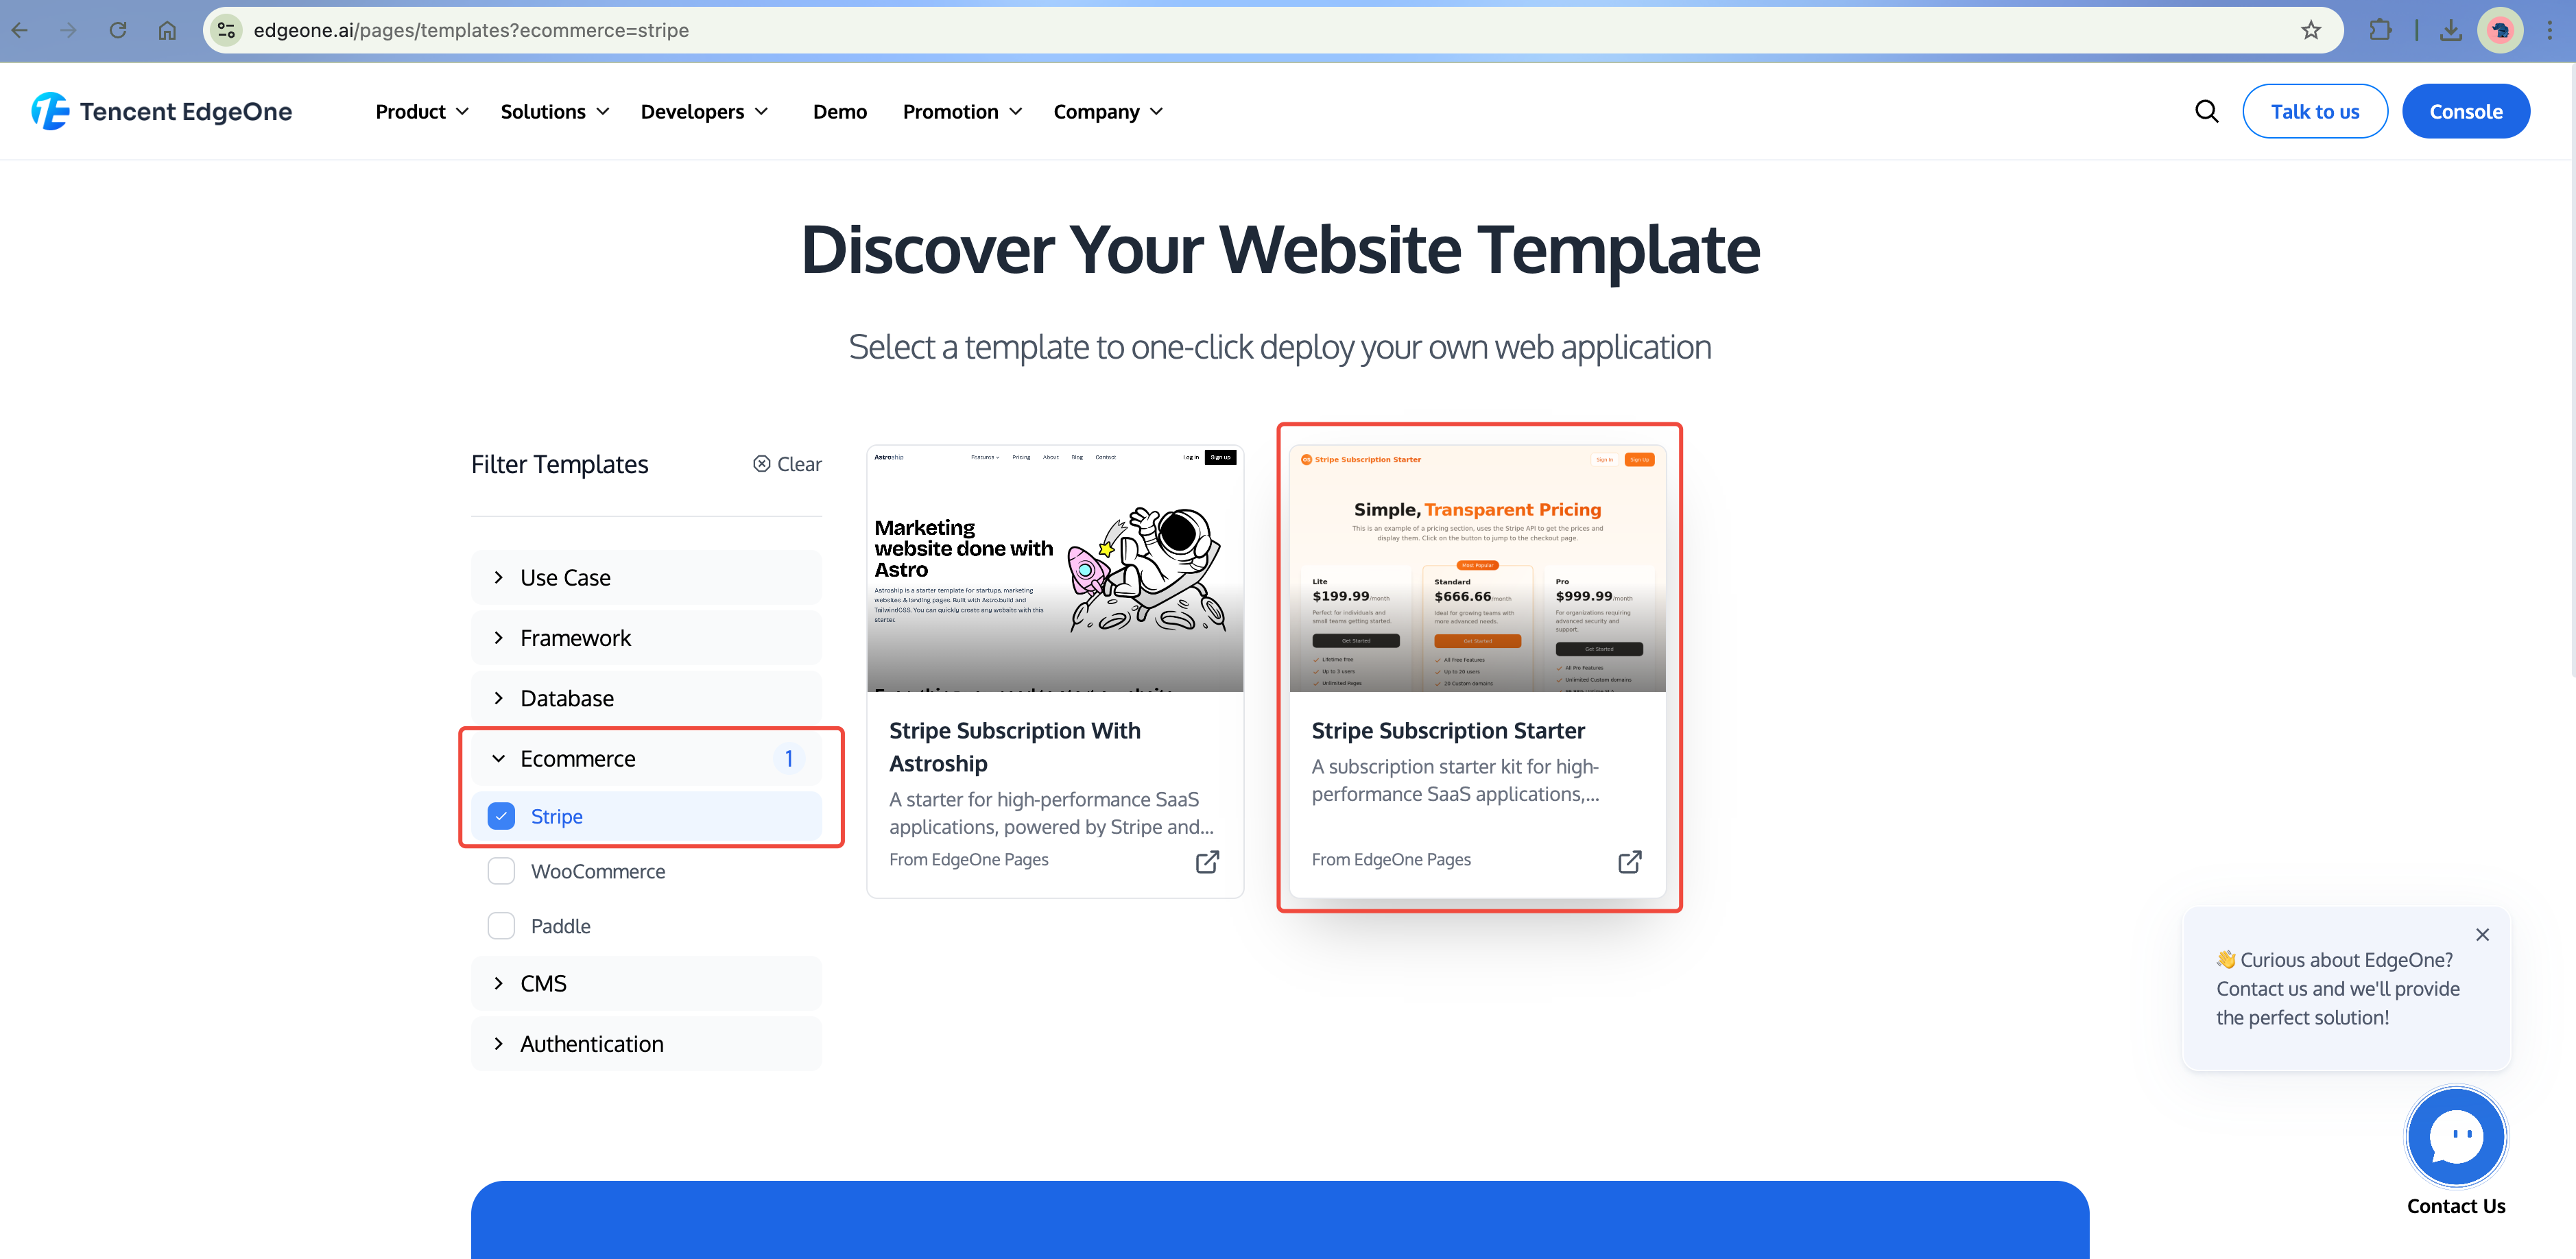
2. Filling in Environment Variables
In the EdgeOne Pages configuration panel, you need to fill in two key information items:
1. Project Name - After configuration, this name will become part of your application's URL. Add this URL to the
Endpoint URL field in the Stripe Webhook configuration (format: ${your-project-name}.edgeone.app/stripe/webhook).
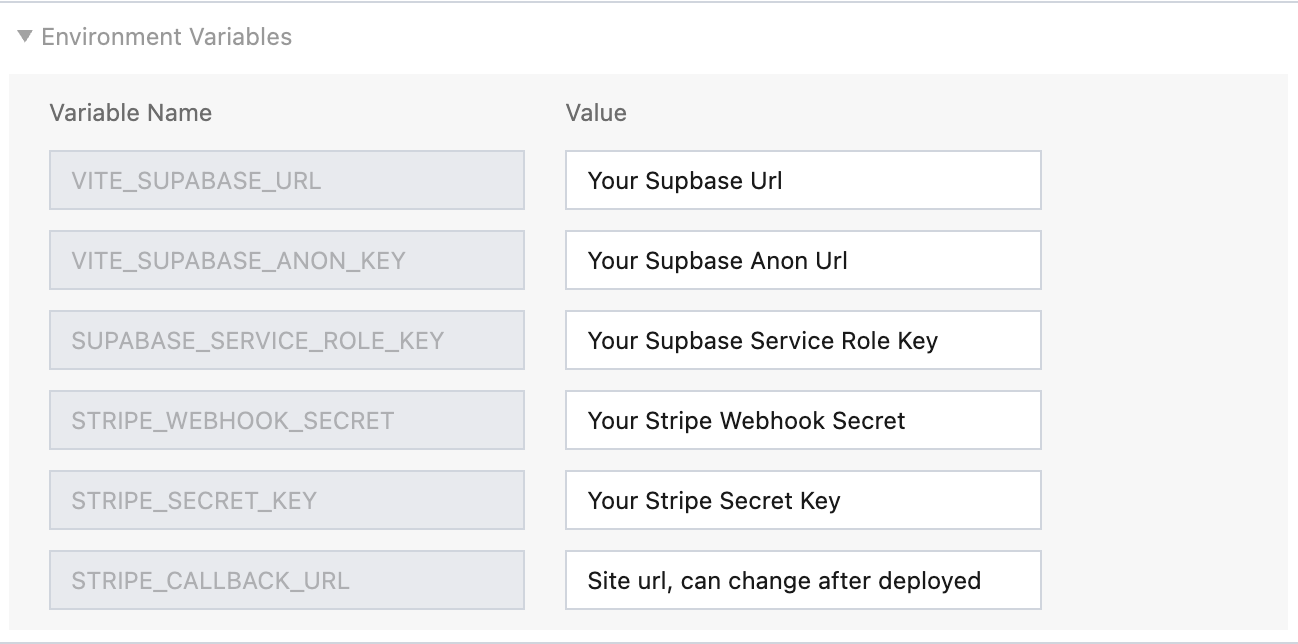
2. Environment Variables - Add all necessary configuration parameters
Supabase connection parameters (refer to the Supabase Integration Tutorial to obtain specific parameter values)
Relevant Stripe parameters (key obtained in previous steps)
After configuring these information correctly, your application will be able to seamlessly integrate with the Stripe payment system and Supabase database.
After filling in the parameters, click
Start Deployment to begin deployment, which will take 1-3 minutes. If the project encounters a deployment failure, you can modify the project based on the Build Logs and Build Summary information, or contact staff for resolution.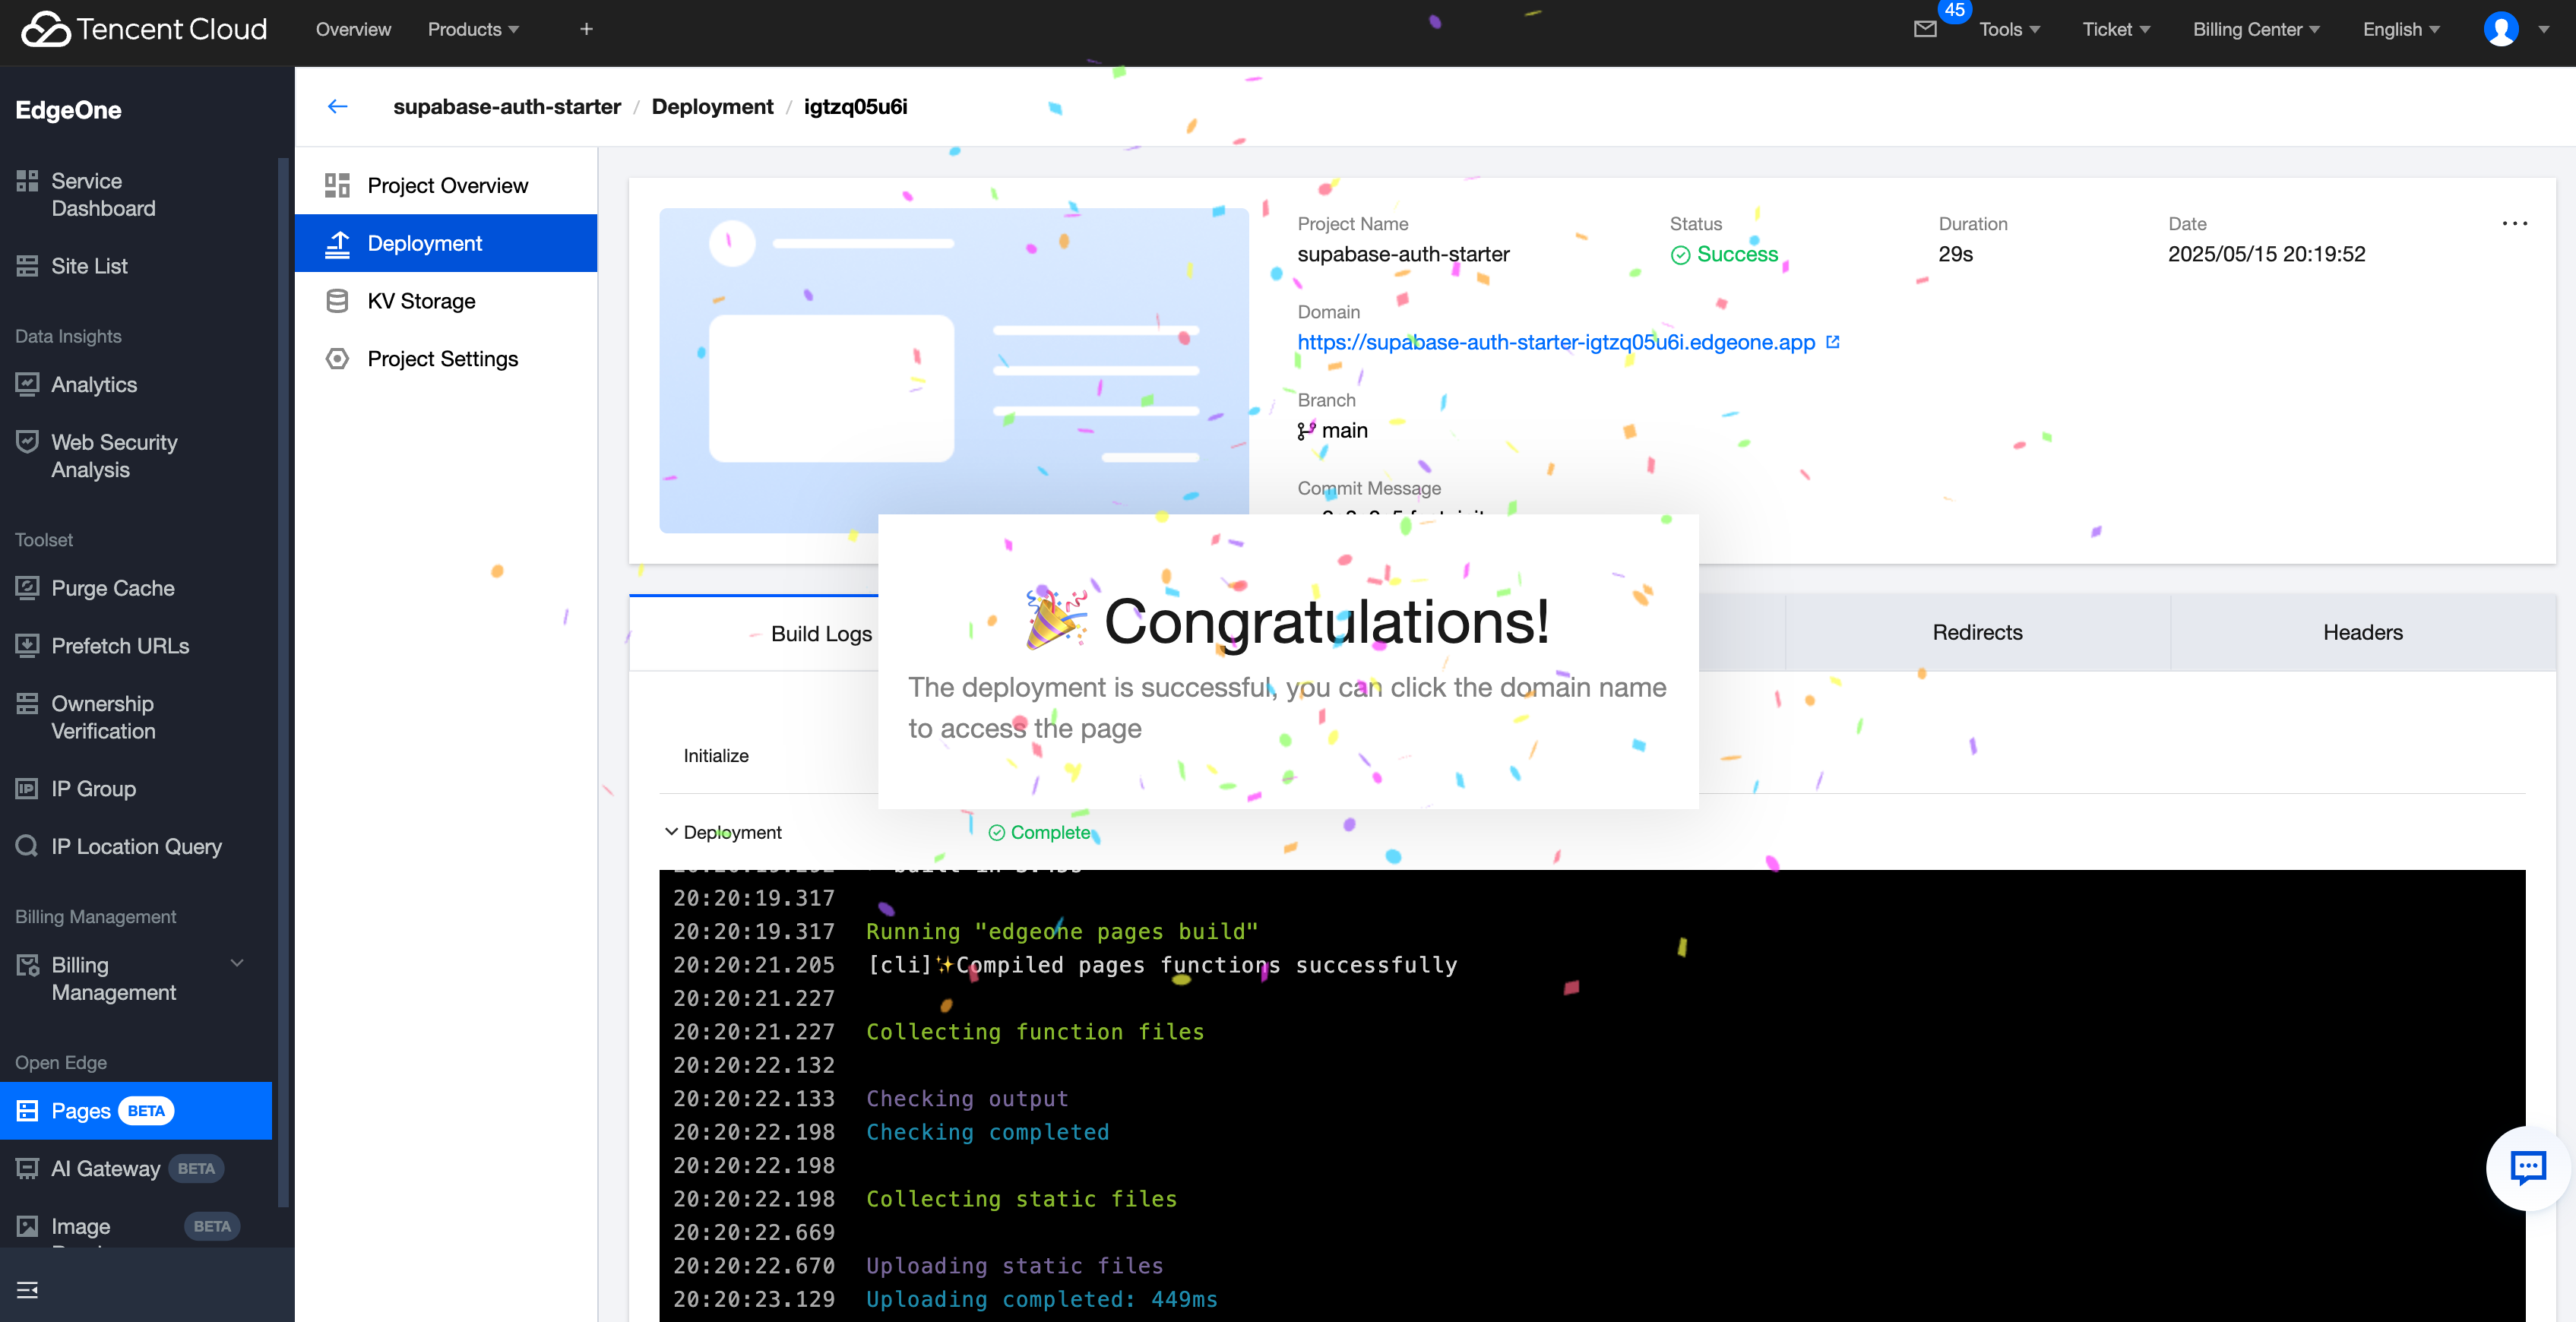
3. Using and Verifying
In the Stripe control panel, access
Product catalog through the left navigation pane, then click the Create product button to create a new product. After creation is completed, the new product information will automatically synchronize to the products table in the Supabase database. At this point, refresh the deployed web page, and you will see the newly created product card displayed on the page.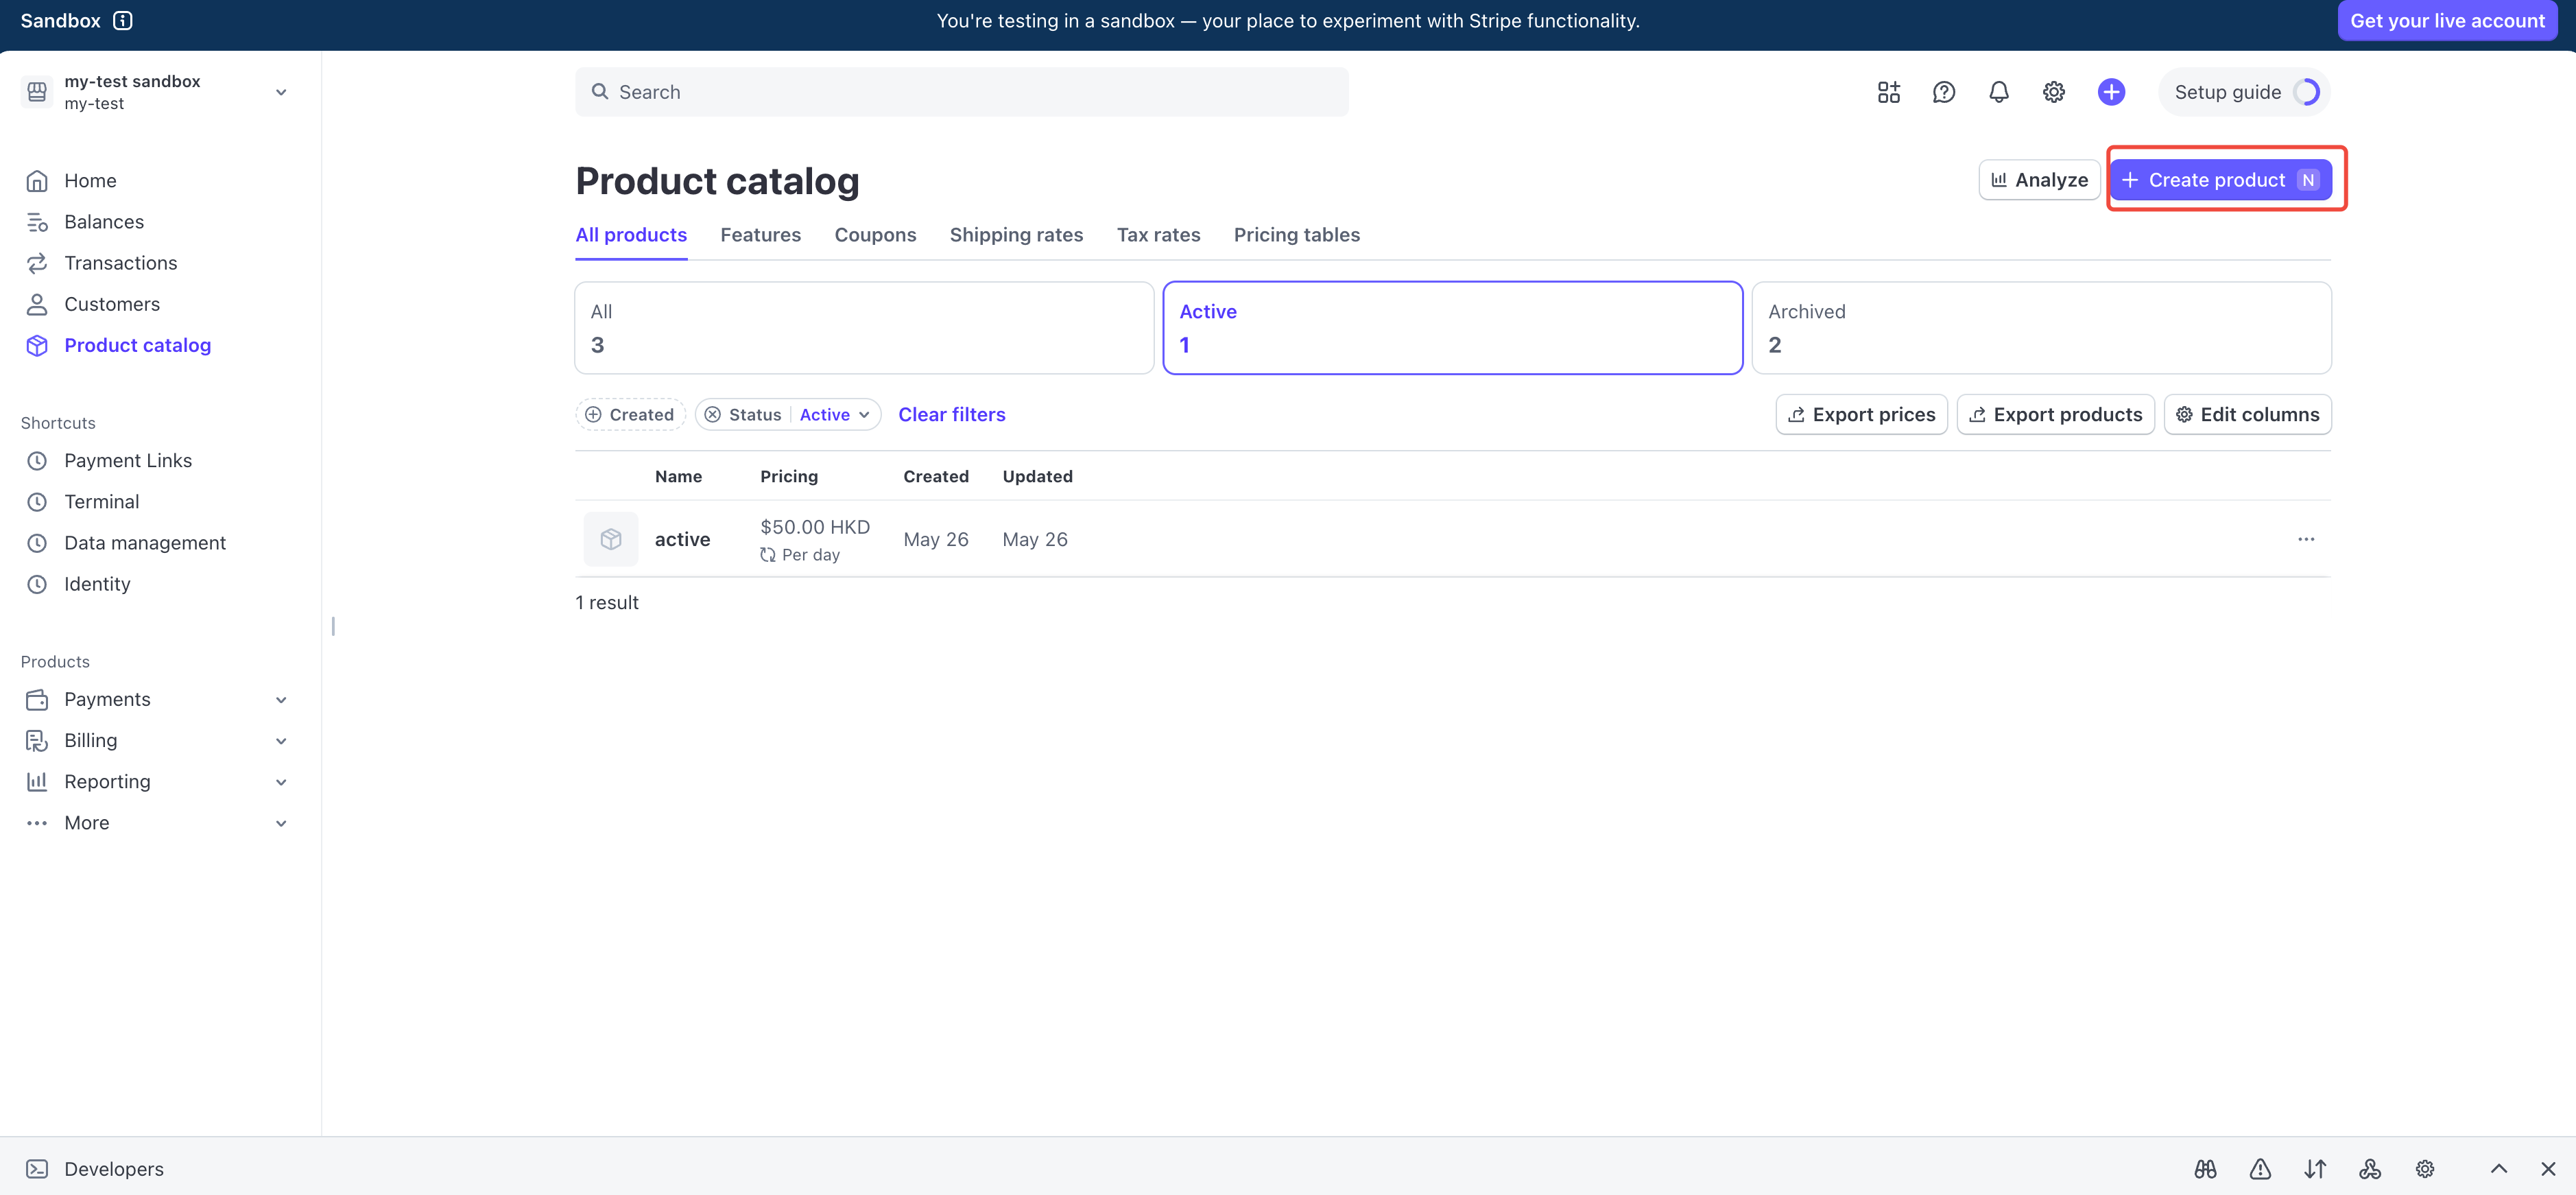
More Related Content
Learn more about Supabase: Supabase Operation Document
Learn more about Stripe: Stripe Operation Document