Adding A Domain Name for Acceleration
This document describes how to connect your domain name to EdgeOne and enable domain acceleration.
Note:
After a domain name is created, EdgeOne will assign a CNAME address to it. You need to complete the CNAME configuration to enable secure acceleration for the domain name. For configuration methods, refer to Modifying CNAME Records.
Prerequisites
1. You have connected the site (such as
example.com) to EdgeOne. If you want to accelerate domain names in Chinese mainland AZs or global AZs, please complete ICP filing first.2. Your site is hosted on an accessible service, such as Cloud Virtual Machine (CVM) or Cloud Object Storage (COS). For example, you have built a cross-border e-commerce site based on Tencent Cloud CVM, and the current server IP address is:
10.1.1.1.3. If the site is connected via CNAME, you must verify ownership of the domain name. If the site is connected via NS, you must modify DNS server addresses first.
Scenario 1: Quickly Adding a Domain Name
If your domain name does not require complex configuration, you can click Quick add to add a domain name and quickly connect to EdgeOne.
1. Log in to the Tencent Cloud EdgeOne console, enter Service Overview in the left menu bar, and click the site to be configured under Website Security Acceleration.
2. On the left navigation bar, click Domain Name Service > Domain Management to enter the domain name management page.
3. Click Quick add to add a new domain name. Fill in the domain name configuration information by referring to Description of Domain Name Configuration Items, and then click Save to apply the domain name configuration .

Scenario 2: Adding a Domain Name and Completing Basic Configuration
If you need to fully configure the domain name's basic information, such as the origin-pull protocol and origin-pull port, it is recommended to use Add domain name. The steps for adding a domain name will vary based on the connection mode you choose.
1. Log in to the Tencent Cloud EdgeOne console, enter Service Overview in the left menu bar, and click the site to be configured under Website Security Acceleration.
2. On the left navigation bar, click Domain Name Service > Domain Management to enter the domain name management page.
3. Click Add domain name . Fill in the domain name configuration information by referring to Description of Domain Name Configuration Items.
4. (Optional)When a domain name is added, EdgeOne provides recommended configurations based on common business scenarios to ensure your business runs more securely and smoothly. You can choose the recommended configuration based on your business scenarios, and the corresponding configuration will be displayed as a rule in the rule engine module.
5. Then click Next.In the NS access mode, EdgeOne will automatically add a CNAME address directing to EdgeOne based on your domain name in the background. You can click One-click Add to immediately enable acceleration. If you need to complete other domain name configurations, you can also click Add Later and refer to Modify CNAME Records for the configuration.
1. Log in to the Tencent Cloud EdgeOne console, enter Service Overview in the left menu bar, and click the site to be configured under Website Security Acceleration.
2. On the left navigation bar, click Domain Name Service > Domain Management to enter the domain name management page.
3. Click Add domain name . Fill in the domain name configuration information by referring to Description of Domain Name Configuration Items.
4. (Optional)When a domain name is added, EdgeOne provides recommended configurations based on common business scenarios to ensure your business runs more securely and smoothly. You can choose the recommended configuration based on your business scenarios, and the corresponding configuration will be displayed as a rule in the rule engine module.
5. Then click Next.In CNAME access mode, EdgeOne will assign a CNAME address to the domain name. You need to complete the CNAME configuration to enable secure acceleration for the domain name. For configuration methods, refer to Modifying CNAME Records. After completing the configuration, click Finish .
1. Log in to the Tencent Cloud EdgeOne console, enter Service Overview in the left menu bar, and click the site to be configured under Website Security Acceleration.
2. On the left navigation bar, click Domain Name Service > Domain Management to enter the domain name management page.
3. Click Add domain name . Fill in the domain name configuration information by referring to Domain Name Configuration Item Description.
4. (Optional)When a domain name is added, EdgeOne provides recommended configurations based on common business scenarios to ensure your business runs more securely and smoothly. You can choose the recommended configuration based on your business scenarios, and the corresponding configuration will be displayed as a rule in the rule engine module.
5. Then click Next.In DNSPod managed access mode, EdgeOne will assign a CNAME address to the domain name. You can use One-click Add to make EdgeOne automatically complete the CNAME configuration for the domain name. If you need to complete other domain name configurations, you can also click Add Later and refer to Modifying CNAME Records for configuration.
References
Description of Domain Name Configuration Items
Configuration Item | Description |
Domain name | A domain name provided for client access. Enter the host record value corresponding to the domain name. Wildcard domain name access is supported. If you need to access the primary domain name, enter @. For example: If you need to accelerate the website www.example.com , enter www here. |
Origin settings | The origin server is the final resource address accessed when the client initiates a request. You can choose from IP/Domain name, COS origin server, and Origin Group: IP/Domain name: Used to connect a single origin server. You can enter a single IP address or a single domain name as the origin server. COS origin server: Used to add Tencent Cloud COS and an AWS S3-compatible COS bucket as the origin server. If the bucket has public read-write access, you can also access it directly using the IP/Domain name origin server type. Origin Group: If the origin server has multiple IP addresses, you can add them by configuring an origin server group. Load balancing: Origin server latency and health status are actively detected, and intelligent traffic scheduling policies are configured to provide more secure and efficient traffic distribution services. VOD: For buckets authorized in VOD, the distribution scope can be set to all files within the application or files in a specific bucket. For example: There is a cross-border e-commerce website built using Tencent CVM. The server IP address is 10.1.1.1 . When configuring the origin server, select IP/Domain name for Origin settings and enter the server address. Note: 1. We recommend that you configure your origin server in the same region as the acceleration region. For example, if the acceleration region is a Chinese mainland availability zone, set the origin server to be within the Chinese mainland for better origin-pull performance. If the origin server is in a global availability zone (excluding the Chinese mainland) and requires cross-border access, the origin-pull effect may not be guaranteed. To accelerate access for Chinese mainland users with the origin server in a global availability zone (excluding the Chinese mainland), refer toCross-regional Secure Acceleration (Oversea Sites). 2. If your acceleration region is a global availability zone, you can add corresponding rules in the rule engine. Set the matching condition to the client's geo location and choose to modify the origin server, directing requests to different origin servers based on the regions to ensure the origin-pull effect. 3. If your origin server type is IP/Domain name, the default origin host is the accelerated domain name. If you need to specify a domain name for the origin host, refer to Host Header Rewrite. If your origin server is a COS origin server, the default origin host is the COS origin server domain name. |
IPv6 access | Choose whether to enable IPv6 access. Refer to IPv6 Access. The default is to follow site configuration. |
Origin Protocol | Select the protocol supported by your origin server. The default is to follow the protocol. Options: Follow protocol: The origin-pull protocol is the same as the user request protocol. HTTP : Use the HTTP protocol for origin-pull. HTTPS: Use the HTTPS protocol for origin-pull. |
Origin Port | Specify the port used for origin-pull. Ensure that the port specified on your origin server is accessible. By default, HTTP origin-pull uses port 80, and HTTPS origin-pull uses port 443. |
Origin HOST header | If your origin server hosts multiple sites and you need to specify which site to access via the origin HOST header, you can select one of the following options when the origin type is IP/domain: Use acceleration domain name: Use the acceleration domain as the origin HOST header; Use origin domain name: Use the origin domain as the origin HOST header. If the origin address is an IP address, this option is not available; Custom: Customize the origin HOST header used when requesting resources from the origin server. |
Verifying Domain Name Acceleration
The verification procedure varies based on the access mode you have selected.
In NS access mode, when the client accesses the accelerated domain, EdgeOne automatically schedule the access to the nearest edge node. You can check whether the IP address of the assigned edge node is on EdgeOne to verify whether the site has been added to EdgeOne.
You can obtain the IP address of the assigned edge node as instructed below.
1. Open the command prompt and run the
nslookup -qt=A www.example.com command. Then, check the IP address of the domain obtained by the A record resolution.
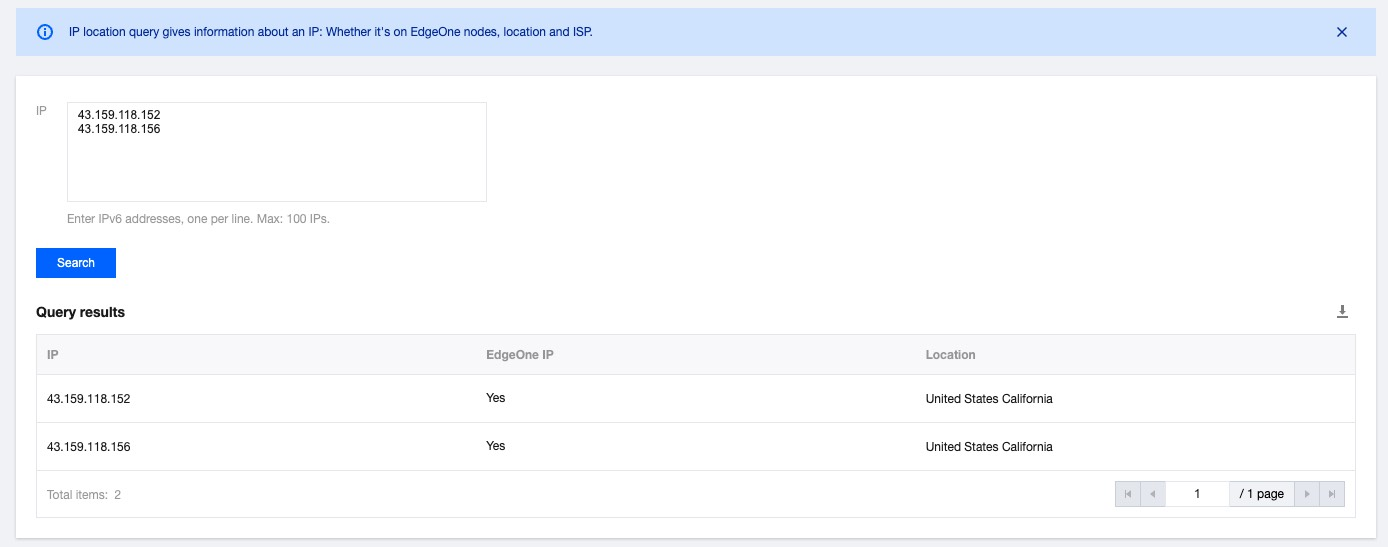
2. On the IP Location Query page of the EdgeOne console, paste the IP address in the IP field and click Search to check whether the IP address is on EdgeOne. If yes, DNS of the accelerated domain has been switched to EdgeOne.

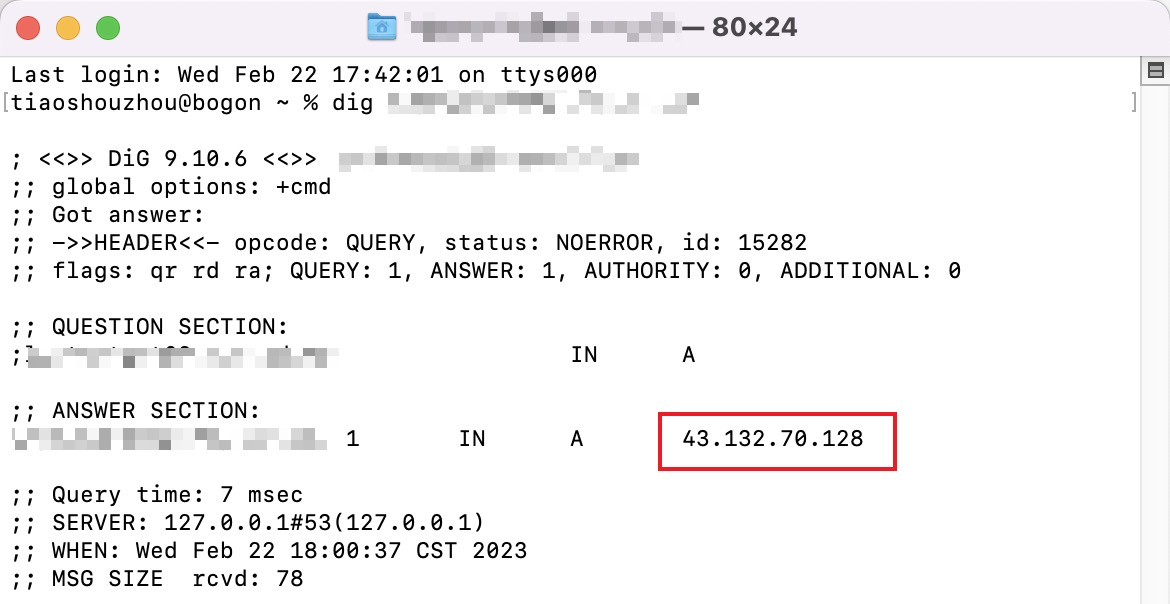
1. Open the terminal and run the
dig www.example.com command. Then, check the IP address of the domain obtained by the A record resolution.
2. On the IP Location Query page of the EdgeOne console, paste the IP address in the IP field and click Search to check whether the IP address is on EdgeOne. If yes, DNS of the accelerated domain has been switched to EdgeOne.

After you complete the CNAME configuration, EdgeOne automatically detects whether the CNAME configuration has taken effect. In the domain list, if the Status of the accelerated domain is Activated, the domain is correctly configured and accelerated.

If you have correctly configured the CNAME record, but the status is not Activated, this may be caused by the CNAME resolution latency of the DNS provider. In this case, you can manually verify the connection as instructed below.
Open the command prompt and run the
nslookup -qt=cname www.example.com command. Then, check the CNAME information of the domain. If the CNAME information is the same as that provided by EdgeOne, DNS of the accelerated domain has been switched to EdgeOne.
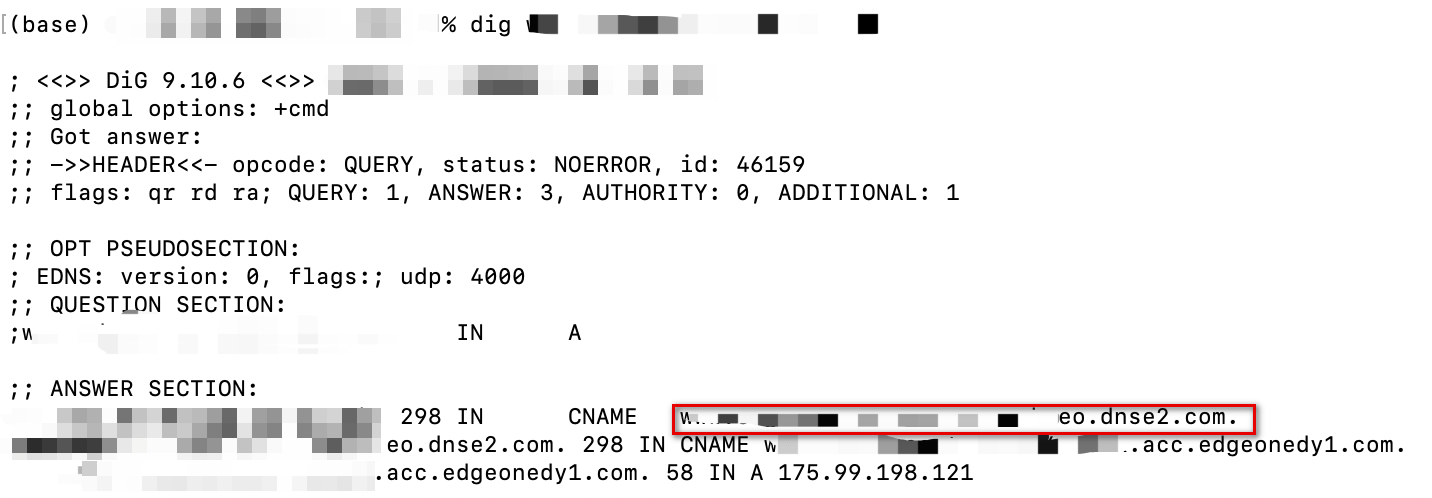
Open the terminal and run the
dig www.example.com command. Then, check the CNAME information of the domain. If the CNAME information is the same as that provided by EdgeOne, DNS of the accelerated domain has been switched to EdgeOne.
After you complete the CNAME configuration, EdgeOne automatically detects whether the CNAME configuration has taken effect. In the domain list, if the Status of the accelerated domain is Activated, the domain is correctly configured and accelerated.

If you have correctly configured the CNAME record, but the status is not Activated, this may be caused by the CNAME resolution latency of the DNS provider. In this case, you can manually verify the connection as instructed below.
Open the command prompt and run the
nslookup -qt=cname www.example.com command. Then, check the CNAME information of the domain. If the CNAME information is the same as that provided by EdgeOne, DNS of the accelerated domain has been switched to EdgeOne.
Open the terminal and run the
dig www.example.com command. Then, check the CNAME information of the domain. If the CNAME information is the same as that provided by EdgeOne, DNS of the accelerated domain has been switched to EdgeOne.