This chapter provides detailed deployment steps to help you smoothly publish your project to the Pages platform. Regardless of whether you are a beginner or an experienced developer, this guide covers various stages from environment configuration to actual deployment. Following these guidelines, you will be able to efficiently manage project deployment, ensuring its stability and availability in a production environment.
Note:
For any new deployment, Pages will automatically create a new and unique URL, which you can use to preview the latest changes of the project.
Lifecycle of Deployment
The deployment lifecycle includes several stages from development to production:
Local Development: You can write code based on your own development habit. It is recommended to pull the latest env file before each development to ensure use of the latest environment variables.
Submit and Push: After task completion, you can push the code to the development branch of the connected Git repository. Every push will automatically trigger a deployment.
Preview: After successful deployment, Pages will assign an appropriate domain name to the deployment. You can generate an access link with a validity of three hours through the "Preview" button.
Production: After the development cycle, you will eventually merge or submit changes to the production branch (typically main). Pages will then re-execute the build and deployment process. Once completed, your deployment will automatically be assigned a deployment domain, including any custom domain names you added.
Expired: When there are more than ten successful deployment records, Pages will retain the build artifacts of the first ten deployments in chronological order and mark other successful deployment records as expired. At the same time, expired deployments will return a 401 status code. You can use the "Redeploy" feature to create a new deployment with the configuration of that deployment, thereby restoring access to the expired deployment.
Trigger a Deployment
Git Auto-Trigger Deployment
After associating a Pages Project with a Git repository, the system will automatically listen for push events and trigger deployment. Currently, only submissions from the trunk branch will automatically trigger deployment by default.
Manually Trigger a Deployment
In the Pages console, you can manually trigger deployment in the following ways:
Click the "Redeploy" button in the Project List to rebuild the latest deployment configuration.
Select a specific deployment record from the build deployment record for redeployment.
Webhook
Besides the above methods, you can also trigger deployments through webhook. Each trigger event is a unique URL that initiates a new deployment via an HTTP POST request. This feature allows you to integrate Pages into your workflow.
Use cases:
Automatically build and deploy when the content in the headless CMS changes.
Implement a fully custom CI/CD process and perform deployment only when specific conditions are met.
Set a scheduled task to update the website at a fixed time.
Trigger deployment through a third-party service, such as auto-update after payment is successful.
Directions:
1. Enter the console, open the project settings page, and find the "Webhook" module.
2. Click "Create a new webhook", enter the name, select the branch, and then click "Confirm".
3. After creation, you can call the API via a POST request within the project to trigger the deployment of the corresponding branch.
Warning:
Webhook are uniquely associated with your project and do not require additional authentication. Please ensure these URLs are properly protected to avoid leakage. If unauthorized usage is suspected, immediately delete and regenerate the hooks.
Integrating webhook with common CMS platforms
The integration methods vary for each CMS provider. Following is a step-by-step guide using Ghost as an example.
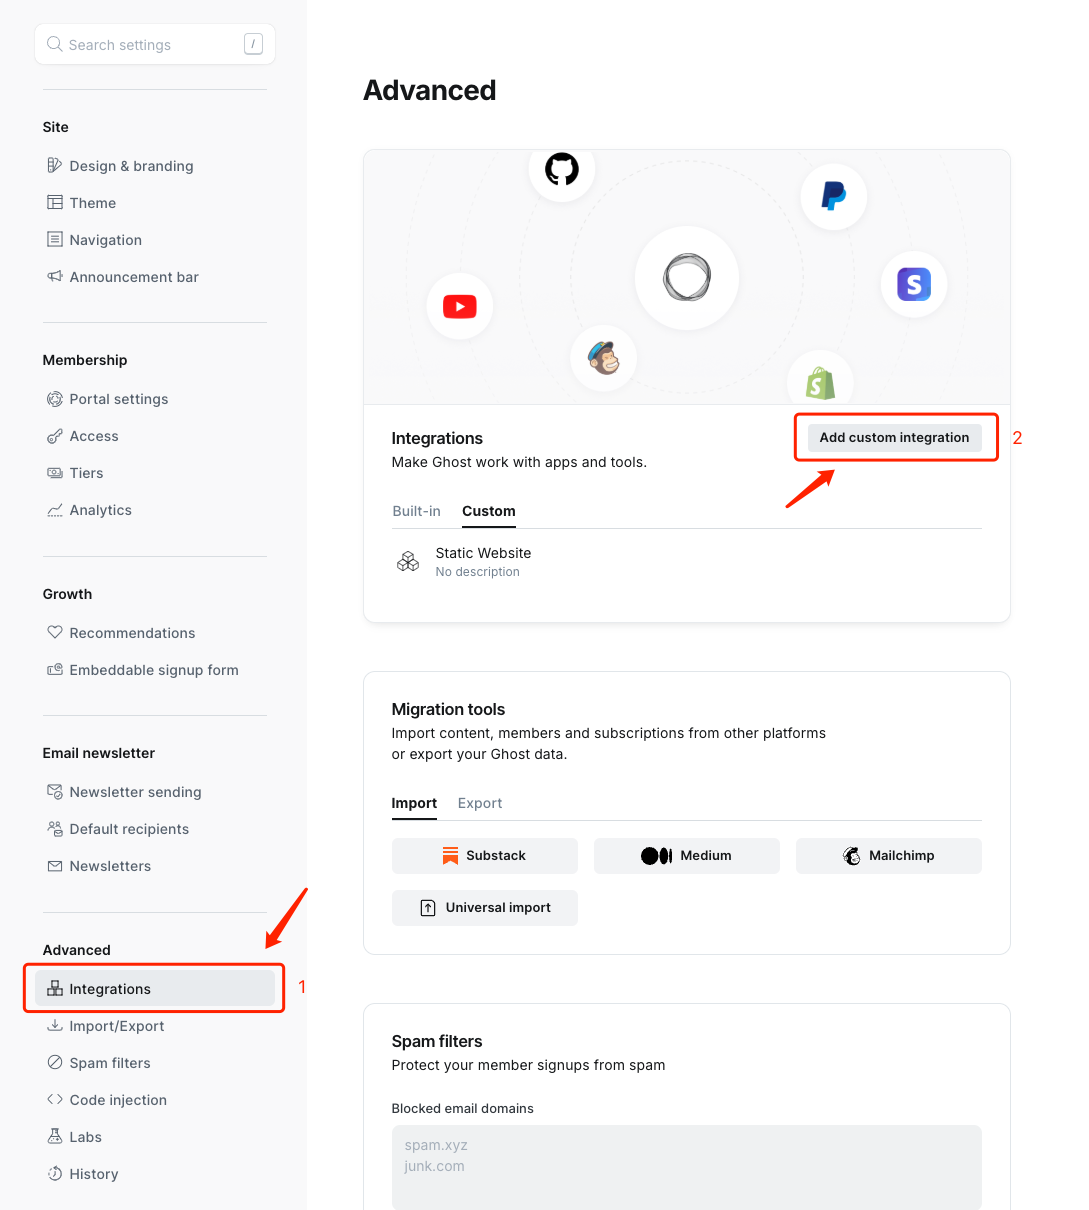
You can configure your Ghost website to trigger the deployment of EdgeOne Pages by creating a new custom integration. In the settings of your Ghost website, go to the integration page and create a new custom integration.
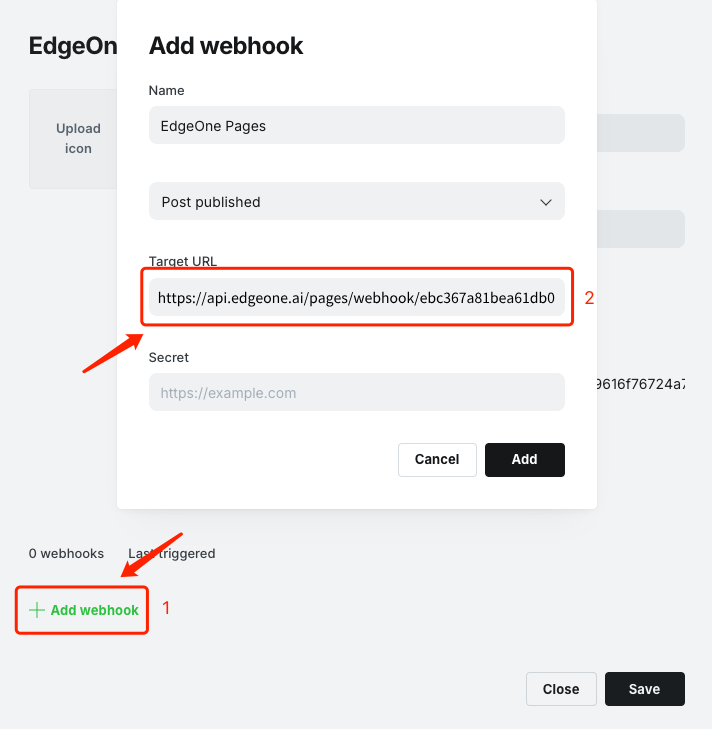
Each custom integration can attach multiple webhooks. Select "Add Webhook" and set the event to "Post Published". Then, paste your unique deployment hook URL into the target URL. After creating this webhook, EdgeOne Pages application will automatically redeploy whenever your Ghost website publishes an article.
Preview Deployment
For each deployment record, Pages provides a unique access link for you to quickly verify the effect.
Note:
We strongly recommend adding a custom domain to ensure your project is more professional and reliable for long-term access. For detailed information on how to add a custom domain, please refer to the Domain Name Management chapter.
Build logs
Build logs record detailed information of each build process, including normal build output, success messages, warnings, and special information of failures. These logs are designed to help users locate and solve problems quickly. Through analysis of build logs, you can easily identify potential errors and warnings in the build process, thereby optimizing project settings and improving build efficiency.
Build Materials
Build artifacts list all files generated during the build process. You can view the name and size of each file in this list, and you can also click on a specific file to view its detailed content, which helps you better understand and manage the build artifacts.
Note:
To improve storage capacity utilization, when the number of successful deployment records exceeds ten, the system will automatically Cleanup the Build Artifacts corresponding to the Earliest Deployment Record. You can use the "Redeploy" feature to create a new deployment with the same configuration, thus restoring access to the invalid deployment.